DST September Newsletter Out!

Zooming right onto my blog porch to deliver the news!

The September edition of the Digishoptalk newsletter is out! My friend Kel, who is the newest editor-in-chief of the newsletter, came out with a super-fabulous issue of Firsts! I love the look of the newsletter, love the editorial piece of Kel, love the theme, love the inside look at designers’ first kits redone… in fact, I don’t think I’ve enjoyed a DST newsletter as much as I have this one! AWESOME job, kel!

Oh, and here’s a little whispered tidbit: I have a little article there too, if you’re interested in reading it. πŸ˜† The newsletter is free, but you have to be registered at DST (also free)… if you are one of the few who aren’t yet registered, go run and get yourself counted among the minions! πŸ˜†
Here’s a screenshot of the first page of my … uh, rather lengthy but (I hope πŸ˜› ) inspiration-filled… article on Recording Firsts:

First Love Article

DigiShopTalk September Newsletter: First Love Article

And with great apologies for putting this up here a bit late (was totally consumed by working on the Type+Writer course, so my memory bank went pffft for a little while), here’s the freebie with items I created especially for layout that I made for the DST article:

LivEdesigns First Love - DST September Newsletter Freebie

LivEdesigns First Love - DST September Newsletter Freebie

Click on the image to download.

Thank you for the love you leave in my blog as you download! I love reading your comments, and am always grateful that you take the time to leave some warm fuzzies.

One little thing I wanted to point out: please note that the papers in the preview are not included in the freebie download (because in the article I had written that I would release as freebies some of the stuff that I created in making my layout that appeared in the newsletter, and I did not use these papers on my layout). BUT I will be putting these papers–and MORE– as free downloads within the next day or two, so if you want them, be sure to come back and grab them! πŸ˜€
All right, my workload is calling my name once again, so it’s back to the saltmines for me! I hope to see you soon again!

Huge hugs to you, my sweeties!

Where We’re At (and other W’s)

Technorati Tags: digital scrapbooking,freebies,Type+Writer

This is where we’re at right now… in other words, this is what you’ll see in any given room at any time of the day if you walk through our home:

Wall-E & Friends

Wall-E & Friends

In fact, even other toys are transformed into Wall-E Wannabe’s: (Sound byte: “Mom, look! I made my own Wall-e!” )

Wall-E, Version 2

Wall-E, Version 2

(That’s actually a toy that can be transformed into virtually anything, but its basic parts allow you to create dinosaurs and vehicles. Cool toys. We only had Lego when we were kids. hehe)

Work

I’ve been totally wrapped up in work on Type+Writer, our up-and-coming first-ever journaling and typography course on our Spraground! I’m extremely excited to be team-teaching the Type+writer course with the ever fabulous Jessica Sprague!

If you love making layouts but struggle with putting down the words to go with the photos, this course is for you! If you love writing, and journaling on layouts comes easy to you, this course is also for you! If you want to explore new techniques for getting those words onto your layouts with Photoshop’s awesome arsenal of tools, this course is for you! If you’ve taken any of Jessica’s online courses, you’d know that she is the absolute Best at everything she does, and you wouldn’t want to miss this latest course that she’s teaching! (Yep, in other words, you, you, and you… we’d love to have you in our course! πŸ˜€ )

So if you haven’t heard about it yet, read all about our Type+Writer course here! Registration will be on September 1st and our first day of class will be on September 8th! Jes and I promise that it’s going to be a fun-filled, very inspiring, creative two weeks that you’ll be spending with us when you decide to sign up for our course! So come, hop, skip, jump, run to the Spraground on September 1st and be counted among the beta Type+writers! πŸ˜€

Where Is He?

My sister left a comment asking me where the photo of Jun was on my blog… the one that he loved, the one that he said he’d use for all publications that request a photo of him. Well, sister dear, this is for you πŸ˜€ :

The Photography Master

The Photography Master

The Photography Master, Take 2

The Photography Master, Take 2

Wow, It’s About Time!

I’ve been wanting to release a freebie for the longest time… I took a break (a mental breather) and found some time to design a little paper pack for all you sweeties!

These aren’t the usual kind of papers that I normally make, but it’s always nice to push the envelope and explore horizons, right? (To my friend, Veevs, if you’re reading this, I hope I’m not too far off the mark when I say that I think these would be the kind of papers you might want to use! πŸ˜† )

So here is a mini paper pack for all of you: highly saturated and textured, for all those layouts that need an extra punch!

LivEdesigns Wild Grafix Paper Pack

LivEdesigns Wild Grafix Paper Pack

Click on the image to download.

Thank you so much for the love you leave on my blog as you download! I totally love reading your comments! πŸ™‚

Well, that’s all for now, folks! It’s back to the saltmines for me! πŸ˜†

Have a happy, scrappy day, my sweeties!

Back with a Vengeance!

Well, hello there! Man, have I missed sitting here with you on this blog porch, just swinging leisurely and sipping contentedly on iced tea, watching the birds hop on the steps and listening to the faint tick tock of the clock…

The past weeks have been more like roaring waves of the ocean rushing forward and falling on top of each other with one deafening crash after another. Major WORK stuff, in other words. P

There still major work stuff to be done, to be sure, but I’m giving myself a break before diving into the salt mines once again. After all, I just finished the article (and met the deadline, woohoo!!!) that I was asked to write for the August issue of DigishopTalk’s newsletter. My friend and fellow Spragsistah Kelleigh is the new editor-in-chief, and she asked me to do an article on Recording Firsts. I think it turned out way longer than it should’ve (lol… not that that’s surprising now, is it? bwahahaha). But, as is the case with all writing projects I delve into, I find myself totally caught up in the moment and am practically oblivious to the outside world, till I’m done with the writing and can come out of my cave like a bear stretching after months of hibernation. Aaaaaaaah. It’s a lovely feeling. )

So… let’s play catch up. So much has happened since I entered the mouth of that cave. πŸ˜†

May Photo A Day Album – Done!

Woohoo!!! I actually got my May Photo A Day album all done and printed out and placed nicely in the pages of my 8Γ—8 album! (Don’t you just love the sense of accomplishment that comes from seeing your layouts actually printed out and resting in those page protectors? I love it!)

Here’s what my album looks like:

the happy 8x8 album!

the happy 8x8 album!


the title page

the title page


Day 1 and Day 2 pages

Day 1 and Day 2 pages


Day 3 and Day 4 pages

Day 3 and Day 4 pages


Day 9 and Day 10 pages

Day 9 and Day 10 pages


Day 15 and Day 16

Day 15 and Day 16


I used my Extraordinary Days Album templates, along with Meredith Fenwicks lovely luscious papers from her Day Dreams Collection Wildest and Afternoon Serenade kits. The staple is from Meredith’s Everyday Inspiration collection and the overlay is from Kim Christensen. I was amazed at how fast putting this album came together… I was able to do all the 31 layouts *and* print them out, cut them, and insert them into the album page protectors within 24 hours! Gotta love templates, huh? (PS. If you want to snag the templates, just scroll down to the earlier posts and I have the links over there! ;) )

First-Ever On-the-Spot Photo Shoot!

On the first weekend of August, a group of us, led by the country’s top pro photographer (and my very dear brother-in-law) Jun de Leon, went to the mountains to take part in a special project put together by Jun. The assignment: Take photos for an entire day to document the first-ever ITC-approved-triathlon-to-be-held-in-Asia (phew! how else do I explain that! ), and it was held in the Philippines! How lucky could we get!

Jun gathered a group of us and gave us specific assignments. We were to take only the photos assigned to us so that we could come up collectively with an extensive coverage of the triathlon from all angles. I found out about this only a couple of weeks before D-day, when we attended the wedding of one of our friends.

Intermission: it was a lovely wedding, where we were requested to come all in black (so that only the bride would be in white).

Here are some of the foolish shots of us: I only put them here because I promised my Spraground friends that I’d show them the one and most probably the only time this year that I would be wearing a dress.

SILLY1Β 
SILLY2
LIVRJ1

So anyway, back to the triathlon event. There were 7 of us in the group, which now has been dubbed by Jun as The Crew. ) (I provide the only estrogen on the team as I’m surrounded by men all around! The best thing about it? My hubby is part of The Crew, which means we get to enjoy our photography addiction and play together! Love that!)

The triathlon event was held on just one day, from 6AM to 6PM. There were two events, the regular triathlon, and the 03, which is basically the same as the regular triathlon but with the distance multiplied by three.

The evening before the event, we met with Leo, one of the best Philippine documentary photographers, who gave us a little seminar on documentary photography. My assignment was to take the Emotions photographs, but the person who was assigned to take the Details photographs didn’t show up, so Jun gave me the Details assignment as well (much to my delight! heehee).

After the seminar and dinner, we went to the event area to conduct an occular inspection of the site and to plan out how and where we would position ourselves the next day. Since we got back to our hotels at almost 11pm and we knew that the athletes would start coming tp the venue at 5am the next day, I decided to forego sleep (terrorized by the prospect of not waking up on time and missing the entire kickoff!)

It was also raining crazily, and so DH and I spent a good part of the night fitting raincoats over our cameras and lenses and trying to figure out a way to maneuver our lenses with the blasted raincoats on them. (Not easy!)

Good thing our kids were with us, because I had fallen asleep at 3AM and woke up only at 5AM when my 4-year-old S asked for his β€œmilky.” I woke up DH and we practically ran out of the hotel to get to the kickoff point of the triathlon (our kids were left with their nannies and our older son).Β 

It was dark and dreary, and the rain just kept pouring down, and after a while you forget about the rain-repellent hoodie you’re wearing and you think β€œoh heck, so let’s all have rainwashed hair, why don’t we?” The sun never shone that day, which turned out to be a blessing in disguise since the lighting was awesome (no direct sunlight and glare to deal with), and the cool winds meant that the athletes didn’t get wiped out with heat and fatigue too easily, which in turn meant that they didn’t take forever to complete the course. )

So there we were, 7 of us, with our cameras and our lenses. I called us the Guerillas, since that’s what I felt we were… charging on ahead, taking the photos from whatever angle and position we could, and because we had media permits, we were able to get to places that the rest of the public couldn’t get access to (since they had closed off areas for the triathlon event alone).

The hardest part of it all? Going straight from 5AM to 6PM without a drop of coffee, no breakfast, no lunch, no snacks except a single banana and a power drink that tasted a lot like my kids’ vitamins. Yuck. The best part of it all? The Crew, the collective energy we had, the adventure of shooting on the spot, playing with our cameras, cheering on the athletes, and taking on this photographic project with DH! Would I do it all over again? You BET!

We had to submit our photos to Jun a week after so that he could choose from them and submit them to one of the two biggest national dailies for publication.

I used my Nikon D80 and my 18-200mm lens. I had my 17-55mm and 85mm lenses as well, but after briefly using them, decided I wanted the flexibility and zoom ability of my 18-200, so I kept that on the entire day. DH used his 200-400mm, and oh boy, does that bazooka lens rock!!! β€” but hubby rocks more, hehe!

Here are the photos that Jun chose from my collection:

And here’s a glimpse of The Crew at work (and at play):

Ooooh!!! The sun is coming up! More tomorrow! For now I have to jump into bed! See you with more catching up tomorrow, my sweeties!

((((hugs))))

Five Firsts!

What is it about first times that make them so special and memorable?

The first steps a baby takes has parents stumbling in their rush to reach for the camera to record the monumental event. The first grandchild. The first day of school (shiny shoes, new pencils, new bag… whee! nirvana for me and my siblings when we were kids!). The first visit from the tooth fairy. The first Christmas.

Then there’s the unforgettable first love (in nursery? mine was… uh, must I incriminate myself and let the world know that I was a lateΒ bloomer? heehee! I had my first crush inΒ  Grade 2–and I think I was mesmerizedΒ by the thick beard around his face more than anything else. πŸ˜† )

If you stopped right now and asked yourself, what are the latest first’s you’ve experienced lately, would you be able to list them downΒ and answer right away? Or would you have to pause as you traipse down memory lane, brows knotted in deep thought, as you try to recall the events of the last five months?

I was fascinated by the thought of First Anything today… and here are my five of my latest first’s!!! (Okay, you can accuse me of shameless–or shameful?–tooting, but hey, as we chanted in Chicago: we are worth it, right? πŸ˜‰ )

First Time to Be Featured in a Graphic Design Blog!

What a thrill! What a pleasant surprise! What a COOL thing to discover!Β This little humble blog porchΒ of mine was featured in two graphic design blogs last June 14th! The post that was featured was Photo Phun!

I almost fell off my chair in utter delight when I saw this:

Graphic Identity Blog Link

Graphic Identity Blog Link

And this!
Estetica Design Forum Blog Link

Estetica Design Forum Blog Link

A huge, happy THANK YOU to Estetica Design Forum and Graphic Identity!

First Time to Visit Chicago & New York

Totally awesome places! Loved The Bean at Chicago, eating deep dish pizza at Giordanos, walking and walking and walking around The Loop, dinner at Fultons by the River, and taking the Riverboat tour!

Chicago - Walking Along The Loop

Chicago - Walking Along The Loop

Chicago Buildings from the Riverboat

Chicago Buildings from the Riverboat

View from the Riverboat

View from the Riverboat

New York Times Square - the view from our hotel room window

New York Times Square - the view from our hotel room window

The Ubiquitous NYC Taxis

The Ubiquitous NYC Taxis

More photos coming in the future… there are just thousands and thousands of them! πŸ˜€

First Time to Hug My Dearest Spraground Sistahs!

In person! What a thrill! This has got to beΒ one of the most memorable and special experiences in my entire life! What a connection!
One of my favorite photos of Jes and me - taken by Susan

One of my favorite photos of Jes and me - taken by Susan

Love this photo taken by Jes!

Love this photo taken by Jes!

Some of my absolute favorite people in the world! - Photo taken by Lisa

Some of my absolute favorite people in the world! - Photo taken by Lisa

The Spraground Sistahs Take Over Windy City!

The Spraground Sistahs Take Over Windy City!

The only downside to this is that I end up missing them so much more now, and wish that the oceans were less wide and the lands were more spread out so that we could literally walk over to each other’s houses and give each other hugs in person anyday!

First Time to Do an Actual Hybrid Project

Ah… this one I was totally not sure about… but with a little modge podge, a little advice from my dear friend Lisa J (who won’t admit to being a creative crafter, but she is!), a little help from a carpenter friend who made the wooden box for me according to my specs, and a little help from my two sons who fixed the goodies/doggies inside it when it was done, I was able to play around with hybrid (yeah, so it was an adventure I’d been longing to do!) *and* use my heretofore unused-but-hoarded paper scrapping materials (and thus feel less guilty about the hoarding, haha) *and* come up with a birthday gift for my MIL who loves doggies!
This is what I started out with: a wooden shelf with partitions, made according to my specs, with 4 rows of 6 little box-houses. The entire thing was aboutΒ 12in x 24in.
D )

Step 1 - Begin with a wooden shelf painted in colors you love (I didn't love the color on this one, hence the decision to decoupage the entire thing! πŸ˜€ )

Step 2 - Modge-podge (yes, I've turned it into a verb!) patterned paper onto the sides of the shelf.

Step 2 - Modge-podge (yes, I've turned it into a verb!) patterned paper onto the sides of the shelf.

Step 3 - Cut patterned paper into vertical strips and modge-podge them onto vertical divisions of the shelf.

Step 3 - Cut patterned paper into vertical strips and modge-podge them onto vertical divisions of the shelf.

Step 4 - Do the same for the horizontal divisions of the shelf.

Step 4 - Do the same for the horizontal divisions of the shelf.

Step 5 - Cover top of shelf with patterned paper. Wash modge-podge off your hands in between applications in case you happen to be munching on chips. ;)

Step 5 - Cover top of shelf with patterned paper. Wash modge-podge off your hands in between applications in case you happen to be munching on chips. πŸ˜‰

)

Step 6 - Cover the back of the shelf with patterned paper to complete the shelf's clothing. πŸ™‚

Step 7 - Attach eyelets to chipboard flowers using the ever-reliable, handy-dandy Cropadile!

Step 7 - Attach eyelets to chipboard flowers using the ever-reliable, handy-dandy Cropadile!

Step 8 - Attach other embellishments to the top of the shelf to complete the look.

Step 8 - Attach other embellishments to the top of the shelf to complete the look.

Step 9 - Make it a family project (and allow yourself to take a break!) - Let kids take care of arranging the doggies on the shelf.

Step 9 - Make it a family project (and allow yourself to take a break!) - Let kids take care of arranging the doggies on the shelf.

Step 10 - Voila! Stand back and clap your hands as you survey your first hybrid project... because you've finally put some of your paperscrappin' hoard of goodies to use!

Step 10 - Voila! Stand back and clap your hands as you survey your first hybrid project... because you've finally put some of your paperscrappin' hoard of goodies to use!

Hee! This was fun while I did it… I’ve always loved crafts, and nothing beats the doubled fun of working on projects with kids… but… what can I say? I love digi first and always. πŸ˜†

And now… to continue the alliteration started with theΒ Five First’s… let’s talk about First FREEBIES!

And yes, I know, I’ve been giving out freebies for almost as long as this blog porch came into existence, butΒ  it’s my…

First Time to Come Up with an Album Template Mini Freebie!

Woohoo! I am so happy about this, and even happier to share these with you!


Here’s how this all ties in with my first First up there and my fifth First down here. Remember the Photo Phun post (the one featured in the graphic design blogs up there)? Well, that all came about because we at the Spraground were having the most fun adventure, led by the awesome Jessica, of coming up with a photo a day for the month of May! And since I’d been wanting to print out those photos and put them in an album instead of keeping them hidden inside a folder in my compy, I decided to create an album for them.


When I make layouts, more often than not,Β IΒ sketch in my trusty little graph notebook (Moleskine graph notebooks ROCK!) how I want the layout to look. And then I translate that pencil sketch onto my computer with Photoshop! So I made a cover page sketch for the album and a few inside page sketches.


While I was working on moving that sketch onto my compy via Photoshop, I decided… hey, since I’m making a multi-photo page for the month of May (which has 31 days and therefore 31 places for photos), why don’t I make a similar template for 30 days? That way, if any of us decides toΒ resume the Photo A Day adventure on any other month, we’d have a ready template for thoseΒ months with less than 31 days?


And then, since my brain is known to dive into this sort of territorial waters–haha, I decided to go full-speed ahead and include February as well (both 29 and 28 days), to complete the entire range of possibilities!


So here areΒ the different cover pages I made forΒ my Photo A Day Album… and I’m sharing them with you, as always!


LivEdesigns Extraordinary Days Cover Page Templates

When you use these templates, just type in the month that applies to your album where the ellipses are (I’ve left the text editable; feel free to change it!). I’ve also included a phrase to show where the journaling can fit in… and below there is an area for you to include a quote if you wish.


These templates come to you in .psd format. Use clipping masks to get your photos and digi paper onto the mats and photo masks. πŸ™‚


Note: If you’re into making regular layout pages that feature months-in-review, I figure these should come in real handy as well!


Click here to get the mini album cover page templates.


ETA: Link removed. See post of September 24 for new link.


Now, I can’t just give you the cover and not give you the inside pages as well, right? πŸ˜‰


Sooo… I created 3 inside page templates, each one of which is a single-photo template. There are two different portrait-oriented / verticalΒ  photo templates for the left and the right side of the album, depending on how your pages turn out; and there’s a single-photo template as well for landscape-oriented / horizontal photos.


I only made three templates because that’s all that I needed… and by using each one of them within the album, you can get an album that’s both pulled-together and unified!


Oh, and there’s a bonus inside as well! I created two black glass accents for use on the album pages… one is a black glass swirl and the other is a black glass circle cluster. I’m including them inside the .psd template files, but they are created on transparent backgrounds, so if you wish to use them in your other layouts as separate elements, feel absolutely free to do so (just read my TOU and don’t forget the credits! πŸ˜‰ ).


I’m presently working on zipping up the inside page templates, but since it feels like forever since I last released a freebie (and I’m uber-excited to share these with you πŸ˜€ ) I decided to release these cover pages now and come back and post the inside page templates in a separate download, once I’m done zipping them up! So don’t forget to check back for them!


I’m going to be working on my Photo A Day album in the next 24 hours (after I get the inside pages zipped up and on their way to you!), and when I’ve gotΒ my layoutsΒ done, I’ll upload them to share with you. If you use these and create pages or even an album of your own, do link me up! I’d looove to see how you use these and I would love even more the chance to marvel at the marvelous creations you come up with!


Alrighty then! Back to the worktable! πŸ™‚

Ready? Set? Action!

Ha. Totally corny title, I apologize. πŸ˜›

But am totally thrilled… just did my first action, which is really really simple, but which arose out of the necessity of uploading loads of photos from our Chicago Spraguefest onto the gallery which Jessica so kindly created for us on our Spraground! I just finished sorting through almost a hundred plus photos from the *first* day of our Spraguefest, and I was scratching my head, thinking, oh wow… if I have to resize all of these to websized files so I can upload them to the gallery, how long is that going to take me? There must be an easier way to do this!

Yep that’s me. Ever since I can remember, I would always think in terms of “What’s the most efficient way of doing this or that?” I guess it’s the latent problem solver in me (just wish this skill extended to a lot of real-life problems, haha!)

So, I did a bit of googling here and there, a bit of fiddling around here and there, and came up with 2 actions!

The first is called Batch Resize for Web, and what it does is reduce the width of your image to 600 pixels (the height automatically adjusts proportionally based on your original image’s height). It brings down resolution from 300ppi or higher to 72ppi, and it interpolates using bicubic sharper.

The second is called Batch Resize Original2Web, and what it does is just bring down the resolution to 72ppi and interpolates using bicubic sharper, but does not change the pixel size of your photo to a given measure. This would necessarily result in a larger physical photo than the first action, but still give you something that can be uploaded to galleries or emails where you are not constrained by small size limits.

I’ve created the action using CS3, so I’m sorry but I have no idea if it will work in Elements. :/

I created the action for doing batch resizing, but it can also be used to resize individual images (photos, layouts, etc) one at a time.

To use it to resize individual images, just load the action in your action palette, open your original image, and click on the Play button.

To use it to resize batch photos, just load the action in your action palette, and then:

1. Start by creating two folders anywhere on your compy. Name one folder “Originals” and the other folder “Resized” (or whatever you want to call it, as long as you know which folder the originals are in and which folder you want the resized photos to go into). Dump all the images you want to resize in the Originals Folder. You can also resize them directly from the existing folder that your photos are in, but in case you have chosen only a specific set of files to resize from a folder that contains more images, the Originals folder would be a better option.

2. Go to File > Automate > Batch.

3. In the Batch dialog box, under Play – locate the name of the action in the actions dropdown list.

4. In the Source area, select Folder in the dropdown list and select Choose. Navigate to the place on your hard drive where you placed the Originals folder. Don’t forget to check the two last boxes that allow you to suppress warnings and options.

5. In the Destination area, select Folder in the dropdown list and select Choose (exactly like the previous step). Navigate to the Resized folder that you just created.

6. In the File Naming area, you can input the names of your files, if you wish to change their filenames. What I did was to choose “2-Digit Serial Number” and keep the extension specified (in my case, jpeg).

7. Don’t forget to check all the boxes in the Compatibility area so that everyone, regardless of what platform they’re using, can view the photos.

8. Click OK.

Once you click OK, Photoshop will open each photo you’ve placed in the Originals folder, resize it, and save it to the Resized folder. Sometimes you might get prompts that ask you to select save settings (mine did for some); when this happens, just click OK and the process of saving the image will continue with the next photos in the batch.

I learned how to do this from Wired How To Wiki, a pretty cool placeΒ I just discovered.Β πŸ™‚

So… for my Chicago Spragsistahs and for all of you, my friends, who’ve come to visit and sit with me on my blog porch, here’s my action set. Hope you find some use for it! πŸ™‚ (And thanks so much in advance for the love you leave on my blog! πŸ™‚ )

ETA: If the 4shared link doesn’t work above (as I think some gremlins have been playing with the link), here’s another place where you can get my action set too.

Oh, and here’s a photo of that lovely time we had… more coming soon!

Β 

Flatties and Realies by the River

Flatties and Realies by the River

Alrighty! Back to the barracks to do more work! See you soon, my sweeties! πŸ˜€

Come on feel the noise…

…girls, rock your boys… we’re going wild, wild, wild… wild, wild, wild…!!!! πŸ˜†

I totally went wildΒ over the weekendΒ at the digiscrapping shoppes; did you, too??? OMG. The joy, the absolute joy, of finally being able to grab those items you’d been longing for, at the best prices too! YAY for (Inter)National Scrapbooking Day!!!

I went crazy at three places: ScrapbookGraphics (where one of my absoluteΒ favorite designers, Meredith Fenwick, has her shoppe), DesignerDigitals (yeah, DD rocks!!!), and ScrapArtist. Where did you go, and how crazy did you get? πŸ˜‰

Now I’m totally stoked to begin working on my backlogged work for the Digi:In Deep course that we just finished last week at the Spraground. I still owe 3 templates and 3 layouts… and I also owe 4 layouts for our Spraground challenges. And I’m dying to create new stuff for you too!!! So look out for that this coming week! πŸ˜€

May Photo-A-Day

The fun never ends on our Spraground. Jessica is soooo awesome at keeping us all entertained!

If you haven’t yet checked out her blog, you should run there right now, believe me! Her latest Photoshop Friday tutorial is wonderful! (And if you haven’t signed up for her blog newsletter yet, carpe diem!!! πŸ˜€ )

Jes has also begun a challenge for May, for everyone! Called Photo-a-Day in May, we just take a photo a day –uhm, you absolutely guessed that, didn’t you? heehee–for each day in May. Then we post our photos on the special gallery that Jes created just for this challenge… and everyone comes to look at your photos and leave love on them! It’s a great Spraground we play in! (So if you’re just stumbling upon my little blog porch today and you’re interested in joining, please do feel most welcome!!! You need to be registered on the Spraground in order to post your photo on our special Photo-A-Day gallery, but no worries!–registration isΒ free! And if you just want to look around… well, you’re welcome too! You’ll be awed my the masterpieces my Spraground sistahs have been hanging on the walls of the Photo-a-Day gallery… and in all the other galleries, too, for that matter! )

So here are myΒ photos that IΒ took for the first four days of May.

01 May – Breakfast Sunshine

Breakfast Sunshine

Description: Took a photo of my breakfast to bring a taste (pun!) of my country to our galleries, haha! This is called suman sa latik. Suman is glutinous rice cake, wrapped and steamed in banana leaves, and latik is a kind of sweet sauce made from freshly squeezed coconut milk and sugar. Taken with sweet, juicy mangoes, this is virtual breakfast heaven!

02 May – Poetry in Bloom
Breakfast Sunshine

Description: went walking around our homegrounds with 2 of my sons, looking for some photo-ops, and saw this beautiful flower (one among many) gently moving in the breeze… sometimes little things like this make you stop and catch your breath and remind you that God writes poetry with his Creation. Sigh. What beauty and perfection. πŸ™‚

Β 03May – Symphony in Ebony & IvorySymphony in Ebony & Ivory

This is a pretty straightforward photo, but one that carries meaning for me. I grew up in a home where the piano played a great big role: I still remember my mom playing for us, and even much later on, when our mom had gone, my brothers and sisters and i would continue to spend many nights gathered round the piano singing and bonding with each other. I knew I would only find my home complete if I had a piano in it; so when dh and I moved to our present home, I spent all my life-savings-as-a-single-woman on this beloved piano (with additional help from dh πŸ˜› ). Hubby and I both grew up with pianos in our homes, so it amuses and delights me to know our sons cannot imagine a home without a piano as well. (And yes, we do play music on it all the time!)
04May – That LookThat Look
Bright eyes shining with purity and innocence, an expression brimming over with earnestness and trust: this is the look I see on my son’s face each time he talks with me (which is like, uhm, the entire day πŸ™‚ ). The eyes of a child: what a precious thing to behold!

CREDITS: I used Mike Brewer’s Frame Action to frame my photos. I take my photos in RAW format, so I definitely do some tweaking to them, most specifically in terms of White Balance and Curves. Other than that, the photos I take are pretty much how they are at the click of the shutter. πŸ™‚

PS. I’m also attaching the gallery descriptions for the photos.
Β 
Β 

Β 

Okay! I guess that’s all for today, folks! Need to get some backlogged layouts done… Will be back again soon, so I hope to sit with you in a couple of days! Have a great day, my friends! (((hugs))))

Well, hello there…

…good old friend(s) of mine… (are you singing along with me? :P)

Man, it’s been AGES! I am soo soo sorry for being absent from my porch swing… I’ve gotten a number of emails asking me why I’ve been quiet… I’ve been wanting, panting, hankering to come here and post freebies but ~sigh~ life has just been moving at full-speed ahead!

The kids are out of school, with summer officially here for the past month… and you who have school-age children just know how that means mom is also officially the Boredom Buster and Head Entertainer and Day Planner. It’s a total pleasure and it’s really my firstΒ job description (being wife and mom, hehe), so “working”Β  on the “peak period” of this jobΒ has been keeping meΒ busy… πŸ˜›

Then of course,Β there areΒ the fabulous courses at our Spraground! Now that’s what keeps me on myΒ Summer Mom toes! WHAT FUN!

We just finished up with the March run of the Up & Running beginners course… and I love that we have a lot of new Spraground family members who are joining us on the Dark Side! heehee! (And that includes my own sister and her three friends! Whoopeedoo!!! πŸ˜† )Β I have to say I looove moderating because nothing beats the pleasure of working with the incredible tandem that Jes and Jared are, and being able to helping others and being part of the incredibleΒ A-ha moments! It’s totally awesome to be part of the learning journey of new (and some old) friends, to see them grow in their Photoshop skills, to marvel at their creations and to be privileged to see them enjoy telling their lifeΒ stories… the joy is just so overwhelming.

Right after wrapping up the U&R course, we began (and are now heading towards the end of the first week) of ourΒ beta Digi: In Deep, my dear friend Jessica’s advanced course for digital scrapbooking. I have to say, each day, when that email comes into my inbox, I amΒ floored by the AWESOME activities and lessons that Jessica has planned for us! It is just so FABULOUS, so wonderful, and geez, I could run out of all the superlative adjectives, and still that wouldn’t come up to describing how much I love this course! Wow!

It’s an action-packed course, and I love every minute of it! But it also means that no matter how excited I amΒ to design new stuff for you (got a whole list of things I want to create for you!), it’s going to have to wait a little bit till I’ve gotten hang of my time management. (Yo, that big compound wordΒ thatΒ really just meanΒ I-would-give-anything-for-more-than-24-hours-in-a-day πŸ™‚ )

We’ve also come up with our Spraground Weekly Challenges, which are open to everyone who’s registered at our Spraground (registering is free; come play with us!) We’ve been seeing a whole load of awesome layouts coming up on our galleries, and, really, nothing beats playing AND learning at the same time!

As if toΒ tease me forΒ my longΒ absence, I open the door to this little place of ours on WordPress, and I am astounded. WHOA. This is totally rocking! A whole new face, beautiful clean colors of cool blues, greys and whites, a totallyΒ modern interface… WordPress is ROCKIN! Whoopee!!! πŸ˜€

Anyway, today I’ve pushed aside all other pressing matters to sit with you a while…Β because I’ve been suffering withdrawal symptoms from notΒ having been with you for what feels like forever!!!

I do want you all to know that I have been keeping you in mind and missing our porch conversations for the longest time! So I’m so glad to be with you today!

Layin’ It All Out

Here are someΒ layouts I’ve come up with since the last time I posted:

Jammin’ in My Jammies:

Jammin' in My Jammies

CREDITS:

Lisa Whitney – ArtsyFartsyPaper ; Katie Pertiet – StarGazers Flourish; Michelle Coleman – Glow Gold Dust Edge ; Chere Edwards @ digiocd.blogspot.com – Scribbles Alpha
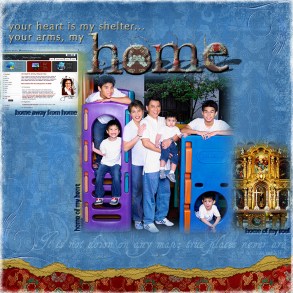
Home

This was done for our Spraground Weekly Challenge Designer Spotlight, where our designer was none other than our fabulous Jessica Sprague! The challenge required us to use nothing else butΒ her Home Away from Home kit, which is fabulous, and the theme “Home”. You can get it Jessica’s fab kitΒ for free on her blog! (Link is on my right sidebar!)

Home

CREDITS:

Jessica’s Home Away from Home Kit (papers slightly recolored); FONTS: Zapfhumnst BT, Tagettes

The Magic of a Child

This was done for our Spraground Weekly ColorLift Challenge, where we are required to do a scraplift (this one by heathert at DD) using a particular color scheme. Totally had fun with this one! (Then again, I have fun with each one! πŸ˜† )

The Magic of a Child

Journaling (Quote by Francis Thompson):

Know you what it is to be a child?

It is to be something very different from the man of to-day. It is to have a spirit yet streaming from the waters of baptism; it is to believe in love, to believe in loveliness, to believe in belief; it is to be so little that the elves can reach to whisper in your ear. It is to turn pumpkins into coaches, and mice into horses, lowness into loftiness, and nothing into everything, for each child has its fairy godmother in its own soul.

CREDITS:

One of my few topΒ favorite designers,Β Meredith Fenwick’s AfternoonSerenade Paper & Antique Paper Swirls; Jen Wilson’s ExtraSmudges (recolored) & Variety Alpha; NatashaWhiteley’s DiffusedGlow action (used on background curtain)

Simple Joys

This was done for our Spraground Merry Go Round Challenge, which required us to use photos that were taken in available light:

Simple Joys

Journaling:

everyday you teach me the beauty of simplicity. you reveal to me the treasures that hide within the smallest things. you run free and carefree, the afternoon breeze playfully tussling your soft hair, the crunchy grass embracing and cushioning your little feet, the warm glow of the sun bouncing on your chubby cheeks. you teach me that true happiness doesn’t cost a thing. it’s found in purity and innocence and, yes, simplicity. you need nothing more than empty space to frolic in to have the time of your lives. and i need nothing more than simply being with you for my heart to be filled with pure, unadulterated joy. ah, true happiness at its very best… yep, it really is that simple.

CREDITS:

Meredith Fenwick – EasySilence apple paper; TwilightDreaming Butterfly, JapaneseTree; CrazyBeautiful-PaintedFrame (recolored) & Alphabet
Annie Manning/Paint the Moon: Charmes d’Antan – Butterfly (altered) & Butterfly Wings
KimChristensen – Spelling101 Kit: Black Inked Overlay

DID I Say…?

Here are the two layouts we worked on for the first week of DID… Absolutely ROCKIN course!!! πŸ˜€

Lesson 1A: Of Friendships & Brotherhood

Of Friendships & Brotherhood

Journaling:

how totally wonderful to see the three of you working together, helping each other. one minute your faces are scrunched up in intense concentration; the next minute your eyes crinkle delightfully as you brust out in silly, boisterous laughter. today you build sandcastles; tomorrow you’ll build even greater things. what i hope remains the same is the spirit of love and friendship that you have for each other as you work and play together. because, my dear sons, more than any tangible thing, you build best when you build bridges of love.

CREDITS:

Everything from the DID Course MaterialsΒ by Katie Pertiet, Jen Wilson, Trish Jones, Linda Gill Billdal, Nancie Rowe Janitz, Mary Ann Wise, Lynn Grieveson. Fonts: Texas Hero, One Fell Swoop, Problem Secretary, English111 Presto BT

Lesson 1B: My Everyday Miracle

We had to create our own layout from scratch, using the techniques we had learned in Lesson 1. Here’s what I came up with:

My Everyday Miracle

CREDITS:

Meredith Fenwick-GrungyBaby papers(blended);Cowboy Papers; CrazyBeautiful-stitched eyelets/Paint-the-Moon Annie Manning-TheNaturalsRibbons-LeavesTie&Shadow/ Dani B-BlackFriday Button/Mary Ann Wise-AlaMode Flourish/Fonts: Porcelain, BeautifulES, SandraOh

As you may have noticed, I am very into Meredith Fenwick’s stuff… that’s because she just re-opened her store at ScrapbookGraphics.com and when I went to get her grab bag (among others, hehe)Β that celebrated her return (man, was that AWESOME!) Mer was soooo generous that I got an additional 50-off coupon to go crazy with in her shoppe again! Woohoo!!! Of course I got all that I could manage to get my itchy digi hands on. hehe.

I asked Mer if I could show you here the items I bought from her SBG shoppe, and she said YES! So… here’s what I’m totally loving right now!

From her Posh Collection:

The Posh Collection

The Posh Collection

The Posh Collection

The Posh Collection

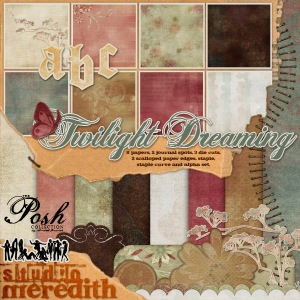
I also got her Everyday Inspiration collection, her Grungy Baby kit, and her Legible Notecards set. They’re all as wonderfully textured and beautiful as the Posh collection you see here!

And since you made it this far…

and because I’ve been gone for so long, I have a little something for you! I’m sharing with you the circle template that I created for our DID Lesson 1B class. It took me a huge amount of time tryingΒ to translate what I saw in my mind onto my monitor… but I am so thrilled that I was able to get it done!

This is a very simple template: I have not added strokes to any of the items (because it’s better to add the stroke after you’ve pulled in your papers and photos to clip on), and I’ve left the drop shadows out so that you can have absolute freedom in deciding where your light source is. I’ve also left the entire thing very basic so you can choose which accents you want to add into your own layout. I hope you find some use for this, and thanks for the love you leave right here on my blog! πŸ˜€

Here’s what you’re getting (the layout I made with it is above):

LivEdesigns DID It Circle Template

And you can click here to get it!

EDITED on October 14th:

I’ve received word that the old link is no longer valid. I’ve re-uploaded and changed the link upon request… you may now click on the image of the template to get the new link for it! πŸ˜‰

Now I really need to get back to my work on the DID course… so I hope to see you soon!

Have a great day, my sweeties!!! I promise I’ll do my best not to stay away so long again! πŸ˜€

She’ll Be Comin’ Round the Mountains..

when she comes… πŸ˜†

Hello from the mountains!!! I’ve been stuck here (happily, I must admit–mostly. I’d be in heaven if I had my desktop here with my CS3 and my dsl connection) for almost a week, spending vacation time with family. I’m writing now from my dinosaur laptop, which doesn’t even have 1GB of RAM (yeah, yeah, sorry isn’t it?)… so, much as I’ve been dying to design and scrap some layouts, I just don’t have those options open to me right now. But you know what? I’ve been scribbling on my notebooks my ideas for more designed freebies, and I promise you when I get back down to civilized lowlands, I will have a lot of gifties waiting to be created and shared with you! Woohoo!!!

I am posting here though on quick notice, upon request from my friend and fellow Spraggirl, Susan. She referenced me on her blog (bless her!) regarding how I keep track of my layout credits, and she has requested me to repeat the instructions for those who have been wanting to know more.

So… here they are, my dear Susan, and many thanks once more!

The Importance of Credits

I really believe that listing credits is aΒ hugely important habit to form, especially in the world of digital scrapbooking where we often share our layouts on galleries, on our blogs, or even in magazines if we’re lucky enough to get published. I have never yet come across a TOU (Terms of Use) from a designer who says “Please, whatever you do, don’t give me credit and don’t say that I’m the one who created this item you’re using to create your layouts!” πŸ˜† Some do say “credit is not necessary” but they’ll also tell you that if you do decide to give credit, they will certainly be appreciative and grateful.

Considering that it only takes a minute to list these credits down, why not take that extra step to express our gratitude and appreciation for the hard work that designers put into making these designs that we happily use to display our fondest memories with, right? (Because it really is not easy to design stuff… fun, definitely–I love it!–but it is a lot of hard work that goes into the littlest thing that is created… and a lot of love! So it’s always nice to give love back when it’s given to us in the form of the digital schtuff that we’re using).

So… credits. Love ’em. Keep them. Announce them. You know the saying, “Give credit where credit is due” ? Lot of wisdom in that one. πŸ˜‰

So how do I do it?

I’d like to believe that everyone in the scrapping world would love to give credit (scrappers are an amazing bunch of loving people)… the problem, I think, comes in when we have used items, changed our minds, replaced those items, and then at the end of it all, we forget from which folder we pulled out this paper and that element… πŸ˜†

So I think the easiest way is to keep track of the credits as soon as we pull in the background paper (which I assume is always the first thing we get onto a new document) and then keep adding to that… and editing the credits to reflect changed items either as we go or at the end when our layout is complete.

There are a million ways to do this–and I think thisΒ ability to do the same thing in different ways is what makes digital scrapbooking rock! It’s simply a matter of finding which way works best for you!Β Some people keep a notepad open where they list the items; other people make a new layer and write all the info there; etc. I’ve tried several ways as well (including making an Excel file to keep track of everything), and through trial and error, I’ve found the best way that works for me is to use the File Info option in Photoshop. (I’m sure also that I’m not the only one who has discovered this, so I can’t take credit for thinking up this process! πŸ˜€ )

Both Elements and full-version Photoshop have this File Info option.

This is how I keep track of credits:

1. Go to File (on Photoshop main menu)) > File Info. Bear in mind that we need to have a document open in order to have this option open to us. Otherwise, with nothing open on our workspace, we won’t see this option open to us).

FileΒ Info

2. In the dialog box that opens, we can put in the title of our document or layout, we can put our name as the creator, and in the Description box, we can also type in all the materials we’ve used, together with the designers who’ve made them.

File Info DialogΒ Box

NOTE: Screen shots are from PSE5 since that is the only program I have loaded on my dino laptop. πŸ˜‰

The great thing about this is as I work, I input the information in the File Info box instead of having to open another document or file to keep track of the credits. And when I save my layout,Β the File Info gets saved along with the document. YAY! No more having to save and store together two different files referring to the same layout!

Then, when we need to put in the credits (say, if we upload our layout into a gallery or onto our blog), all we have to do is click on File > File Info, highlight the content in the Description box that contains our credits list… thenΒ copy/paste the information onto the Description area on our gallery upload dialog box, and voila! It’s all there!

What I love about this is that it’s kept separate from the LO itself, but in the same “drawer”– if you will– so that it never gets “lost”. Also, if midway I decide that I want to replace a particular item that I’ve used on my layout and inputted into my File Info, all I have to do is delete that item from the list in my File Info box and add in the replacement details. Then when I hit Save to save the file, everything is replaced as well with theΒ updated credits list. Awesome, isn’t it?

Hope this is of help to anyone who can use the info! (By the way, the File InfoΒ of your photo files already contains all the EXIFΒ details pertaining to your photo–isn’t that marvelous?)

Alrighty then, back to the mountains! Catch you again soon!

Up to my eyeballs….

with stuff to do, so I’m so sorry that I’ve been absent for quite a bit.

I do have a freebie for you to download, but it’s atΒ Little Dreamer Designs (had to verify first if it was fine to put up the link here)… and it’s in the Apprentice Freebies gallery. Mine is called AdVenture by LivEdesigns, and it’s on the 3rd page of the freebies. You’ll find it HERE.

PS. You have to be logged in / registered in order to download the freebie asΒ the apprentice kits are exclusive to LDD. It’s one of my most favorite sites… so if you haven’t registered, please do… there are mounds and mounds of wonderful digi stuff in their shoppe too! πŸ˜‰

Thanks for coming by… andΒ HUGE HUGE HUGE THANK YOU HUGS to all my GFs (that’s girlfriends and guyfriends πŸ˜† ) at Spragueland who’ve been incredibly supportive and a huge source of inspiration to me! I can’t even begin to tell you how much you mean to me; words will never be enough.

I’ll catch you again soon, as I have to beat some deadlines here… back to the saltmines! πŸ˜†

Love ya, my sweeties! πŸ˜‰