Necessity and Invention

Necessity is the mother of invention,” so the proverb goes. (And by the way, did you know that the original author of this wise saying hasn’t been established yet?)

Well, in my line of work, I have to confess that I get excited by needs. And one fine day, I stumbled upon an urgent need of a very good friend of mine, Linda, who also happens to do a great job of creating layouts, designing, putting together wonderful table settings, taking stunning photographs, and… well, I digress. But yeah, she’s an amazing jack-of-all-trades, and she needed templates to put together a wedding album for friends (she took the photos, of course). And she needed it quick.

And just like that, my creative muse went on a thrill ride and this product is what is now sitting on my shelf, thanks to the inspiration from Linda.

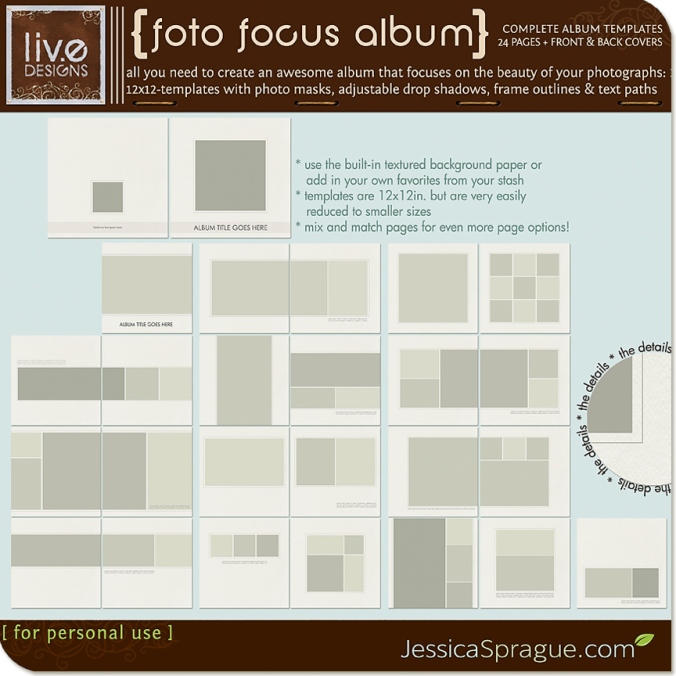
My Foto Focus album templates are a huge collection of 26 fully-editable layered 12×12 templates for a complete album, including front and back covers. All templates come complete with a deliciously-textured paper to provide the perfect background to make your photos shine forth, as well as editable drop-shadows, photo masks, outline frames, and optional text paths. The design is deliberately kept clean and simple so that your photos and stories take center stage. The templates are so versatile that you can mix and match pages if you need more than a 24-page album, and you can even pull in your own papers and digital stash if that’s what rocks your boat!

Let’s have some amazing eye-candy, why don’t we?

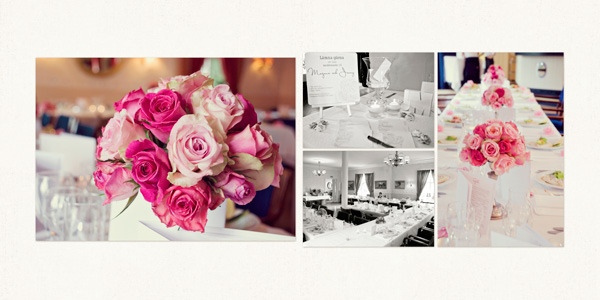
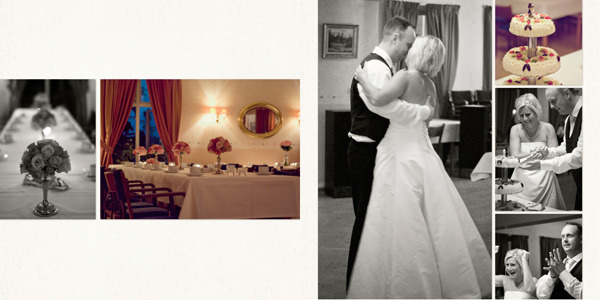
Let’s start off with some stunning pages from Linda’s wedding album!

Adorable, right? When photos paint a thousand words, who needs more of the written stuff? (The text paths on the templates are optional, so here Linda has done away with text and simply lets her photos speak for themselves).

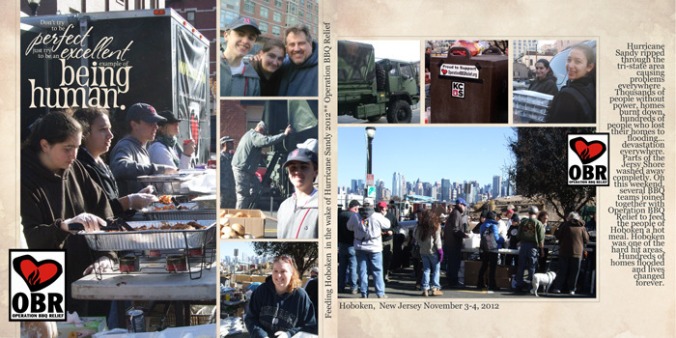
Here is a truly heart-warming and moving 2-page layout created by Chrissy. I love how it celebrates the generous spirit of her entire family in the aftermath of Hurricane Sandy.

This wonderful layout by Lisa demonstrates how each template from the album also does a great job for single-page layouts!

On this awesome layout, Barbara does a marvelous job of taking the template and adding her own personal touch (and embellishments) to it!

Remember this wonderful Halloween layout by Rachael from some posts back? I love how the template she used totally puts the Focus on her marvelous Foto! 😉

Did I mention that this entire 26-template album set is on sale at 25% off till midnight Pacific time? Go grab it (click on the image of the product above, or click right HERE ) and you’ll never have any lonely photos suffering in the innards of your hard drives. Bring out those marvelous stories and lay them out with the help of these templates and watch with joy as your family and friends oooh and aaah over wonderful shots and equally wonderful memories!

Have an amazing first day of the week, my dear friends! I’ll see you soon! xoxo

The Product of a Sleepless Night

Sleepless yet productive. Is that even possible?

I used to be able to go sleepless years ago without feeling the brunt of it… at least not immediately. Back in college, I remember a sem when I had, oh, probably 4 or 5 major subjects, all of which required a monstrous amount of research papers to be submitted before the sem ended. I went without sleep for 3 days straight, buoyed by a constant caffeine drip supplied in numerous cups, and though I walked like a zombie on the day of submission, I did get those papers in.

Moving not too far back, about 4 years ago when I started out at JessicaSprague.com, I used to be able to function on 2 hours of sleep (earning the nickname “alien” in the process, since I seemed to be awake and on the boards at all hours). I could sleep for 4 of the 24 hours of each day and still have all the energy to live both real life and virtual life completely.

Ah yes, those were the good ol’ days. But nothing lasts forever, right?

Without warning, age crept up on me and with one sweep of its arm banished the invincible energy of youth. Suddenly I found myself at the mercy of huge yawns and eyelids that wouldn’t stay open without toothpicks to hold them up. Suddenly the siren call of the pillow was louder, drowning out whispered temptations of prowling about online, learning and teaching and creating till the wee hours of the morning. Suddenly “the spirit is willing but the body is weak” was no longer some childhood saying that I could not relate to; it had become reality.

And so now, with the odd exception or two, I find myself crawling into bed when the clock strikes 2 hours past midnight (sometimes, shame on me, even before that, if I’ve had a particularly heavy day).

But, like I said, there is the odd exception or two, when sleepless nights are called for, whether by force of circumstance (deadlines! deadlines!) or by desire (ooh, I just can’t quit pinterest when there’s just so much eye candy tonight!) or by… ahem… school projects of the kids.

That’s right. I did say school project. 😐

My son needed to submit a parent-child project for his Religion class, which required him to make a scrapbook (Ding! ding! Did anyone say scrapbook? Move aside while I do a happy dance! 😆 ). This being the month of October—which for Catholics is the month of special dedication to the practice of praying the Holy Rosary, the kids were required to make a scrapbook on the mysteries of the Holy Rosary, with images and 2 prayers to be written under each image: one from the child and one from the parents.

So my son and I set to work on getting the images the week before, in between reviewing for their exams, and trying to figure out how to word the prayers we would be creating for the project. We searched high and low on the virtual highways, and we hit the motherlode when we found this site, which had the most beautiful images (and multiple ones, too, for each mystery of the Holy Rosary. Squeal!)

That turned out to be a really good thing, because over the weekend, my littlest son got hit by the sickies, which kept him in a very uncomfortable state (and his parents in a very alert, concerned state) while he nursed a 40ºC fever that wouldn’t go down much throughout the next 2 days. So suddenly the plan to complete the project over the weekend turned into a plan to complete the project at the end of the weekend. And that is how I found myself laboring over the final production of the project way into dawn of the day when it was due.

But! As the famous bard says, all’s well that ends well. Thanks to one sleepless night of extracting my kid’s penciled prayers, doing layouts, printing, trimming, and pasting… voila! My son and I were able to submit our joint kid-parent project! Thank heavens!

I just have to insert this aside: I can’t even remember the last time I created a layout (not for lack of desire but purely because of lack of time. Scrapping is many wonderful things plus delightfully therapeutic, but with deadlines to conquer, both virtual and real-life, in my case it’s also often what gets pushed aside first in favor of chasing other speeding trains. I wonder if other designers share this experience?). Well, thanks to my son’s required project, that “scrap-less” equation has been reversed.

30 layouts. One sleepless night. Love it. 😀

So here’s what we came up with:

The cover:

And the back cover:

The title page:

And because the book I was using had more pages than required to house all the mysteries, my son and I decided to include a photo of the Pope praying the rosary (thank you, Google images 🙂 ) and another image of Our Lady with the rosary.

Another extra page housed yet another beautiful quote and then the individual pages of each mystery preceded by a “chapter page.” (Warning: Be prepared to be deluged by quite a number of images :lol:).

Phew! And that’s it!

Just something else I wanted to mention: I was incredibly glad that I stocked up on a couple of these 8×8 white hard-cover blank books (with awesome textured paper) from one of my favorite shops, Muji (minimalist, back-to-the-basics, filled with neutral colors, stocked with a large variety of products from stationery to food to clothes and gadgets… I can spend hours and hours in this place). I think I feel the need to go back and hoard some more stuff! LOL!

Hope you have a wonderful, sleep-filled night, my friends! I’ll see you zzzzzzoon… 😉

Totally Thrilled!

Oh what a thrill! Another thing to cross off my never-ending perpetually-accumulating To-Do List!

I’ve always wanted to give my little blog-porch a facelift but somehow never had the time to get down to that business. Finally, after spending the past two days fiddling around and figuring out (thank you, google and WordPress Support Archives) how to customize my blog, I’ve gone and done it! Wheeee! (Did I mention I have the ability to jump for joy over the littlest things? 😆 )

So here we are. A spanking new and shiny look!

*Sighing happily* Yes, I am tired from all the blog-renovation work, but I’m equally happy, so I hope you don’t mind if I kick off my shoes and plop down on this bean bag and paste a silly crooked grin on my face. 🙂

Oh, do feel free to wander around and check out the new additions ( I am personally thrilled by the dropdown and flyout menus right up there in the navigation bar!). It’ll take some time to fine-tune all the other little details but I have to admit (sheepishly but honestly) that I’m really happy with the new look right now.

So welcome to my new-old bloggyblog, and if you can spare a line or two, let me know what you think! You can say you love it or you can say you don’t… we’re pretty democratic around here. 😆 (And okay, quite honestly, it’s time to get out of lurking and onto my porch swing so we can exchange stories… I’ll even throw in a bribe of freshly-baked chocolate chip cookies and lemonade juice, iced tea, hot cocoa or freshly-brewed coffee for good measure! 😉

How to Make a Laptop (in 17 Easy Steps)

It’s no secret that I’m a hybrid wannabe. Here’s the thing, though: the biggest reason why I don’t do much hybrid stuff is because I never have enough time (or motivation) to get out a whole bunch of yummy, textural stuff then create stuff with actual scissors and glue and rulers and cutters while making sure that my younger kids don’t accidentally, say, touch the hot glue gun and then clean everything up after. Phew! See how tiring that was just to read? Can you imagine actually doing it? (Hybrid experts, I salute you!) 😀

So when one of my sons takes home a school project that requires parental participation, I sigh and scratch my head, but really, I’m secretly delighted because I have no choice! I have got to get down on my knees and put my hybrid skillz (whatever little I have 😉 ) to work!

This weekend, it was my six-year-old boy’s turn to be my school-project-partner. The task: Create a toy laptop using at least 5 different recycled or old materials.

Nice.

Well then… there was nothing to do but get to work! (And maybe get the camera out, too, so that in case you ever find yourself having to create a toy laptop from recycled materials, you just might find some cool ideas here! 😉 )

STEP 1: Do the caveman thing: hunt and gather!

First order of the day: Collect all the junk you can get your hands on. Never mind if you won’t end up using half of them. It’s just nice to know that you’ve got enough junk to create with (and by using them, you make space for even more junk to collect! Win!)

STEP 2: Have the essentials ready.

Essentials in this particular case would be the project instructions, your hand-drawn diagram of what the finished project might look like, a list of possible materials to use for each part, and yes, that ever-essential super-mug of coffee (or Diet Mt. Dew or hot cocoa, or whatever makes your little hybrid heart happy).

Step 3: Rule it!

Grab the biggest carton that you can find. (I knew there was a good reason to hold on to that box of my laptop stand! 😆 ). Get the metal rulers out (a metal ruler doesn’t get nicks like plastic rulers do, in case your cutter decides to get naughty and cross paths with it). Start trimming off the edges you won’t need.

Step 4: Get a super-cute hybrid helper.

Just because it’s always fun to work with a cutie. 🙂

Step 5: Slot it.

Cut little slots into the sides to create flaps, which will then become the fortified sides of your box.

Step 6: Nip and tuck.

Or, actually, fold and tuck… the sides of the box. Use masking tape to keep the flaps down, in case your carton is thick and refuses to stay down.

This is going to form the body of the laptop. (I’m just sayin’… you know… just in case the box starts to resemble something a pizza would be delivered in… which I think it kinda did for a while. And that’s how I knew we needed to break for a snack 😆 ).

Step 7: Tape and cut.

Oookay. When your tummy is settled and happy, get one side of an old gift box and measure it so that it fits inside your main carton. This will form the base upon which your keyboard will rise. 😉

Tape the sides of the keyboard base. Then cut out 4 strips (measured to fit in the inner part of the other side of your main box). The leftover carton trimmed from the box comes in handy for these little pieces.

Step 8: Got foam?

If your old box came with packing foam inside it, like mine did, do the happy dance! If it didn’t, any semi-stiff material that you can find lying around will do the lift-up job.

Let me explain the how’s and why’s:

Cut up strips of foam and stick them around the sides of the keyboard base. Oh, and the middle part too! This will take care of the extra cushioning you’ll need so that the keyboard base doesn’t lurch inward once eager kid-fingers start “typing” on the keyboard.

Step 9: Bring out the gun.

Turn the keyboard base over, take your glue gun and shoot glue over the sides where the keyboard edges meet with the lower part of the carton.

Step 10: Slice and dice.

Take the leftover carton and cut little strips for the trackpad (scissors come in handy for curving the corners of the trackpad) and then cut the strips into little squares to form the keys.

Stick all of these temporarily with masking tape on any expendable piece of carton, just so you can see how the keys will all line up (plus it makes it much easier to paint them, which is the next step coming up).

Step 11: Go forth and spray.

Step outside into the great green garden, carrying old newspapers to protect the grass… and spray away with old paint left over from various projects.

Step 12: Be Sharp(ie)!

When the paint has dried, take your Sharpie pen and write the letters and symbols of the keys on the little painted cardboard squares.

TIP: It helps to copy from a real laptop! 😀

Step 13: Monitor, monitor.

Print out whatever image you want to use as your monitor image. For our project, I transformed my Facebook page into my son’s using Photoshop. I replaced the profile photo strip with photos of him working on the project. I included an imaginary conversation between his teacher and him, which was a great place to list all the materials he used on the project. 😀

Step 14: Have an apple.

Print out your logo, cut, and paste on the cover of your “laptop.” (I briefly considered using a mango or some other tropical fruit, but Apple won in the end. Hahaha).

Step 15: Watch the wires!

Take a pipe cleaner and bend it a bit. Stick this onto a strip of black leftover carton (folded in half to create both sides). Tape a tiny piece of cut-off pipe cleaner to form the other metal side of the plug. Stick back and front sides of folded carton with glue gun.

Step 16: Check it out!

Check if your laptop looks fine. Do a whoop and a victory battle cry together with your cutie hybrid helper!

Step 17: Fall in love…

… when you see the look of sheer delight and excitement on your little project-partner’s face!

And voila! You’re done! Wooooooot!!!

PS. And if it looks like your little ones aren’t going to sleep early that evening because they’ve “got work to do” on their laptop, don’t say I didn’t warn you! 😉

Confessions of a Hybrid Wannabe

First confession: I actually have just one. One confession, and it’s simply this: I am a hybrid wannabe. HAHAHAHA! 😆

It helps to think this way every time my kids have some school project that requires “parental involvement” (which basically means you roll up your sleeves and go splashing in the mud with the kiddo).

Friday afternoon when I picked up J from school, I walked into what looked like a cloud (of thinly-veiled stress) hovering over my co-mothers. The reason: we just got a letter which basically said our kids would be having a mask-or-hat parade first thing on Monday morning, and the kids had to make their own masks “with help from their parents.” It would be graded as Homework. This meant only two things: (1) “make masks” = don’t even think of making a trip to the shops to buy a pre-made mask; and (2) “with help from parents” = goodbye, relaxing weekend.

The mask had to be a storybook character, and the kids had to be able to act in their character. Hmm. Wonder what the easiest mask to make would be? Mickey Mouse, right? (I mean, really, how hard can it be to trace one big circle and two smaller circles, stick them together, and paint them black and red? 😀 ).

But my son wanted to be Optimus Prime. I tried to convince him to explore other characters but he really wanted to be the Transformers chief. So I thought to myself, oh why the heck not? Let’s just go with what he wants; after all, it’s he who has to wear the mask and act in character. 😉

So Sunday afternoon my son J and I set to work with leftover pizza carton boxes (good thing Son No. 2 had some school friends over on Friday evening, and lemme tell ya, those boys can eat a whole truck of pizza if you dared them). We gathered toilet paper and old newspapers and PVA glue (paper machie ingredients), foil, poster paint, colored popsicle sticks, pipe cleaners, and whatever else we thought we’d be needing to make the mask. And just so you know? We ended up using about 10% of the loot that we collected. 🙄

Just in case your kid happens to come home one of these days with the same homework, I decided to share the mask-making process with you (heehee).

First order of the day: Trim the box to a more manageable size. (Also, resist the urge to order another box of pizza to eat while working 😆 )

Then, roll box around the head of your kid and mark where the eyes, nose and mouth areas should be. This is to ensure that your kid doesn’t go bump in the night while he walks around with the mask, and that he doesn’t get dizzy from the leftover-pizza-smell on the box.

Cut out eye area from the carton and fit. (Be prepared to fit a lot during the process. Better to stop and fit rather than go from beginning to end without interruption, only to get into a fit when you realize the eye area is just the right fit for the… nostrils!)

Cut out the portion that will go over the nose and mouth area.

Don’t omit this most important part: Stay awake with coffee (or Diet Mountain Dew or Pepsi, if you rock that way 😉 ). Because, my dear friend, at this point we’re not even halfway there 😛

Fueled by cafe, cut out the breathing area…

… and (behind the scenes) stick all the rest of the materials you have: more cut-up pizza carton, crumpled and squished newspaper, bottle caps from Florida Naturals juice, a couple of pipe cleaners to hold the mask in place over the head, and tape: lots and lots and lots of tape to hold it all together.

Oh, and I did say don’t forget to fit, right? 😉

Next, check the time and decide NOT to do paper machie because your mask will never dry in the next 6 hours. So decide to take the mask outside under the stars (yes, the moon had risen by the time I got the entire thing modeled to go) and spray-paint it entirely with silver paint in a can. (It totally helps if your paint says “dries in 10-15 minutes”). Try not to sweat the small details (like when you realize that there’s a slight difference in the texture of the paint on carton versus paint on tape, just let it go… 😆 ).

Then paint in details with acrylic paint. (I tried poster paint at first and almost freaked out when I realized the poster paint wouldn’t stick to the silver paint! It was doing its own kind of “crayon-resist” performance. Thank heavens for craft rooms filled with paper scrapping stuff that has been hoarded–and hardly used–over the years, mwahaha. Those things come in handy at exact times like this.)

Do a final fit to make sure everything’s fine (and make sure the tape at the back of the mask is patted down without any areas peeling off because you definitely don’t want parts of your kid’s eyebrows to come off together with the mask 😆 ).

Let mask dry overnight, and reassure your kid that you both did a great job together, and it doesn’t really matter whether you win the mask contest or not because you had a lot of fun creating it together anyway, and that is what matters. 😉

Then go do some work on the Spraground (if you live there like I do, lol!) and then force yourself to sleep at 3am because you’ve got a big day tomorrow watching your kid in his mask parade.

D-Day:

Optimus Prime meets Captain Hook meets Bugs Bunny meets two Cats in the Hat and…

A hop, a skip, and a jump…

And we’re done! 😀

PS. The kids in the primary grades voted for the winner. Guess who won?

Whoopee-doo! Whodathunk, huh? 😆

Project … 323?

Okay, so I totally flaked off despite all my good intentions to stick to Project 365 or Project 52 or Project 12… and now it’s down to Project 323 for today (which is totally senseless, I know, except that it’s the date that this photo got taken). I got as far as 19 photos in January. Took more than that, for sure, and daily ones I dare think, but never got to save any as websized files since the 19th. Maybe I’ll go backward. Maybe I won’t. hahaha. Who cares? It’s all good! Don’t-stress-about-it is the name of the game! 😆

So here’s the one of March 23. Will have to find the time to post the first 19… and then the rest that came after.

Illuminate My Soul:

dsc_0039-live-032309-w

PS. Adobo Putoshop was Photo #032409. Yay! Got two posted! heeheehee!

Over and out!

Oh yeah!!! YEAH!!! { Of Projects and Contests }

I am doing the happy dance because little by little my projects– Big, Small, Medium, Smaller, Smallest–they’re all beginning to come together and run towards completion, and that means more playtime!!! YEAH!!! I totally feel like a kid who just finished studying for the final exams. Oooh, thank God I’m light-years away from those days!

A quick run-down of the stuff that’s been accomplished, for those who care to hear:

The Big Project, DeliveredThe Big Project

– did final tweaks on the entire thing two dawns ago (yes, I count by dawn now, not by night 😆 ) and it’s on its way back to Hong Kong now. Hopefully it won’t be FedExed back to me with new work to be done on it. Keep your fingers crossed for me, will ya, honeys?Here is Mr. FedEx Box, as tall as my 5-year-old son’s study table in the background, where I embarrassingly dump all my design notes and books when he’s not using it. (The table is a wonderful ikea light-wood table with matching chairs and a bench… which you cannot appreciate since it’s totally being blocked by this humongous friend of mine. And PS. if you look real close, you’ll see one of my clearbooks behind with the title “Digital Design 2” on its spine… there are about 6 of those filled with notes I’ve gathered and made so I can flip through them when I feel the need for some waking of the creative mojo. hehe).

What Mr. FedEx carried inside (didn’t bother to measure its width, but it was about 6 inches wide… standing up like that the box reached about halfway of my thigh, and no, I’m not a midget. 😆 ) were the blueprints and proofs of the Big Project, which I had run through oh about 6 times already… and on the flap in the plastic place was the DVD which contained the same files… I had to blur some surnames and the name of the studio as I don’t have clearance to release the names, but if you look closely you’ll see an envelope there with To: and From:, which we would repeatedly just jumble up as the box passed from my friend Tatum to me back to Tatum and back to me. (In case you don’t remember from the past post on the Big Project, Tatum is the layout artist I have been working with… love that she keeps the same ungodly hours as I do. We send each other text-messages on our cellphones and they invariable contain some reference to life: A sampling

Me: Are you still alive?
She: Yep, still awake.
Me: Good, so glad we share the same night-owl genes.

OR:

She: Still awake?
Me: You kidding? Coffee runs in my veins.

OR:

Me: T, it’s 5.30 AM and I just can’t do this any longer, my eyebags are large enough to cover my entire body like a blanket. Goodnight. Or good morning.
She: Yeah… goodnight. Tomorrow again…

The Medium Project aka The Brochure

– Done! My sisters asked me to make the brochure for their business, which involves supplying products for hotel gift shops in Asia. Did the design, layout, and photo editing (the last one was not part of the deal, but I just couldn’t stand not tweaking the photos to make them better 😆 ) for their brochure. This was loads of fun, and what made it more fun is that they gave me their logo, their swirls, and their logo colors which were all professionally made for them (read: paid for 🙂 ). The brochure consists of about 40 cards inserted into a beautiful silk box with a band to keep the pages all together. I don’t have the sample of the box, but when it arrives, I’ll take a photo and post it to complete the experience. haha.

Here’s a sample page:

Medium Project Sample

The Small Project aka The Blinkies

– Jess requested for blinkies for those who took her past Up & Running courses (ours was the beta June run, then there was the August run, and now we’re right at Week 1 of the October run–which I have the honor to moderate in again… fun, fun, fun!).

I had never done blinkies before, but I sooooo love dealing with never-before’s. The challenge of tackling the unknown and undiscovered gives me the same rush as it does a mountaineer who’s given the task of scaling K6 or Mt. Everest! I love the discovery and adventure and learning that always go hand in hand.

So anyway, thanks to the wonderful world wide web, I was able to gather some information on how to do it… and it took me roughly the better half of a day to do the first blinkie for Up & Running and roughly the better half of another night to do the second blinkie for the Now We’re Rockin’ course of Jess (a new one that opens in a week, and my playmates–most probably, you too!–and I are so excited about being all together on this course!). NOTE: If you want to see the blinkies I made, they’re blinking right on the bottom right side of the sidebar on the right of this page! 😀

You know what’s amazing? Blinkies are basically animated designs, and making them is like making a moving cartoon. You have to be able to imagine how the next movement is going to happen, sort of like seeing the whole thing unfold in your mind like a muted movie in slow-mo. Cool! The first blinkie had 42 final layers (and I’m not even talking single layers, these are 42 merged layers… the single layers could easily be twice or thrice as many). The second blinkie had 78 layers. The tutorials I had chanced upon on the web had about 3 or 4 layers up to 12 layers… so if anyone thinks that it’s difficult to make blinkies, it’s totally not. It’s just time consuming. I’d be glad to help you out if you were interested. 😀

Here’s the second wonderful thing about making the blinkies. All the tutorials I found were done using CS2. I am much more comfortable using PSE 5 at this point because, ahem, PSE 5 is my BFF. CS2 and CS3 are nice acquaintances. Not the first ones you think of running to when you need some friendly advice. And so I worked on the layers in PSE 5. But then… and here’s the real fun part for me… I needed to use Image Ready in CS2. There’s a way to do animation in PSE 5 which I had toyed around with once in the past, but it didn’t really excite me then. I was searching for a greater source of excitement. So I opened up CS2 and Image Ready, and voila! It was so EASY to use! (I should’ve probably prefaced this with letting you know that full-version Photoshop, though resting in the innards of my compy, still intimidate me with how GRAND they are. The learning curve just seems too steep to climb, especially if one is working round the clock and trying to beat a deadline, whether actual or personally set. With the blinkies, Jess was so wonderfully accommodating with the time I needed to work on it, so I know my wanting to produce it immediately was s self-inflicted deadline.

It was a load of fun. Lots of trials and errors all the way from beginning to end (best way to learn!) … and quite addictive too! 😛

The Smaller Project

It’s that time of year again when the community’s newsletter, of which I am editor-in-chief, is due. Or I should say was due. Ideally, since it comes out quarterly, we prefer to release it to the community within the first week of the first month of each quarter. Well, this time all the deadlines were pulling at my hair, legs, arms… and so this was the first to get delegated to what Franklin Covey calls B-priorities. So yesterday I got that finished with just one little part missing: my regular column’s content. I have a regular column there called ParenTTalk, which is absolutely wonderful because it’s right up my alley of interests (I love families and kids!) and basically, I get to rant and rave  to my heart’s delight about any topic under the sun. Mostly I rave. I don’t think I ever rant. Except when the moon is blue. 😀

The Smallest Project

Smallest only because in the list of priorities, it’s a NICE-to-do, not a HAVE-to-do… this refers to my wanting to design the next FREEBIE KIT offering for all you wonderful friends of mine. I know what I want to do, I have images rolling about in my head as to what it will be… and now I will have the time to indulge! Whoooppeeee!!!

So I’m really very sorry, no freebies in this post… but SOON there will be! If I don’t run out on my fuel tonight (since the sun was rising by the time I jumped into bed last night) and my blurry eyes clear up (they get blurry everytime I lack sleep), by tomorrow hopefully I’ll have a freebie up for you, so do check back! I am so sorry for being a total dweeb at posting in my blog these past few days, and thank you for your patience with me!

And The Others

There are a load of other things that I’ve been wanting to do but which have invariably been pushed to the back because of the Bigger Projects demanding attention. Still, not having been able to do these things caused a lot of frustration in me that there weren’t 72 hours in a day!

Doing the Rounds in the October MB and Gallery

This is always so much fun for me. I love getting to know the new students; totally love being able to help them out; and absolutely love seeing their layouts come up. Some show immense growth as the days go by, and others are adept immediately from the start in an awesome way. I have a soft spot for the digital virgins / digital newbies because I know, from experience, how wonderful in a jump-up-and-down way it is to be able to discover and learn new things, and feel like “hey, I can actually do this!” That’s a totally great feeling. I make it a point to hop on over to the MB everyday, but the gallery I hadn’t had the time to go through yet. Well, today, I went through all of them and was delighted to see everything popping up there! These girls are really just so awesome.

Taking a Walk in the Playground Gallery

Another thing that frustrated me was not having the time to play around with my playmates in our General Forum playground. Well, I was able to do some hopping and skipping around the playground today for a longer time, and I loved going through all the layouts that had mushroomed in our gallery while I was busy “making a living,” (And I put that in quotes, because much of what I do is gratis, so one cannot really refer to it as making a living then, can right? hehehe). I am sooooo proud of the layouts that my girlfriends are coming up with! Jessica’s site is just bursting at the seams with wonderful, awesome talent! Amaaaaaazing.

Doing the Stand Up & Scrap Challenge

I have so far successfully avoided the booby traps of getting eliminated from the Stand Up & Scrap (SUNS, as I like to call it) challenges. I have said before that my only objective in joining the challenge was, in true Survivor fashion, just to finish the race without getting eliminated. Four weeks and four layouts after, with a fifth one due by next Tuesday, and then just one more… I’ve so far been able to hang on. The challenge is the first contest I’ve ever joined (give me a break, June was just roughly 3 months ago! 😆 ) and I’ve learned a lot because of it.

Since each week comes with both a Design Focus and an Inspirational Focus (like the theme of the layout, which also comes with a quote), I like that I’ve learned how to work within a tight box where limitations and lines are clearly drawn, at least in terms of the design and theme, and always with the tools you’re allowed to use (in this case, only kits and designs made by approved designer-sponsors). I also like that it comes with a deadline that will get you eliminated if you don’t meet it. Sometimes that kick in the butt is just what’s needed to get something going. (Oh yeah, a major procrastinator in many instances standing right in front of you here). It has also forced me to manage my time wisely, to really think out which one has to be done “yesterday” and which can be pushed for later. I also love that there are so many different layouts–numerous amazing and awesome ones–that are so inspiring. Eye candy is always so delicious!

Here are some other things I’ve been delighted to discover in the process (like bonus eureka moments 🙂 ).

* Because there are so many different layouts, and many of which are of the collage and altered art type, I’ve learned more about my personal style. If before I only kind of thought so, I now clearly know that I like creating clean, graphic, simple layouts more. I know I like grunge, but only a touch of it. Not a whole lot of it. I know that I like scrapping about happy moments, precious moments. I know I most probably will never scrap about something disturbing, though I admire greatly those who have the courage to do so.

* Because there are hundreds and hundreds of participants in the challenge, I’ve found that I like love adore the close-knit warm family atmosphere of our playground at Jessica’s. Don’t get me wrong, there are many fabulous scrappers–all of them!–in the challenge. But perhaps because the contest is anonymous (for reasons I completely understand and agree with), it also makes one feel a bit disconnected. I don’t know how to explain it; I’m sure I’m failing somehow. I like the contestants, the moderators, the challenges, the forum, the designers, the judges… but you know how it is when you love someone but you don’t really understand to what extent, and then something happens so that it becomes crystal clear to you just how immmmmmmensely you love them that it’s hard to put into words? That’s exactly how I feel about my Jessica-family!

Doing the PSF Challenges

To keep us busy in the interim of our Up & Running and Now We’re Rockin’ courses at Jessica’s, the amazing Lisa took it upon herself to lead us in doing Photoshop Friday Challenges (also found at Jessica’s site… they’re free and awesome; ifyou haven’t tried them yet, go ahead and click on the link to Jessica’s site on my sidebar over to the right). These have been loads of fun, and I am totally amazed by the work that my JS-family has been coming up with in the gallery. Amaaaazing!!! I am so proud of them!

Unfortunately, because of the deluge of projects with deadlines that like sticking to each other, I have only been able to complete 2 of the 7 PSF challenges that Lisa has come up with. Actually, I have completed more… I used some of the PSF tutorials to do some of my SU&S contest entries… except that contest rules do not allow us to post our contest entries on any other galleries till the 6-week contest period is officially over. So right now I’m behind the boat in putting up layouts on my home gallery. But I’m hoping to get to that soon. 😉

I have to say at this point that I am awed by some of my girlfriends, because quite a number of us are participating in the SU&S challenges and yet they are able to come up with layouts for the PSF challenges as well. I wish I had their energy and endless supply of creativity! I wish I had more time! 😀

And speaking of time…

I’ve rambled long enough. There won’t be any time to create more freebies if I keep this up. And at this moment, other new projects have surfaced, calling for attention. So off I go, back to the salt mines! Do pass by soon: I will be putting up layouts by my wonderful friends who have used the freebies (if you have used my freebies and you will be so kind as to allow me to hang them on the walls of my blog, then please feel most welcome to send me a link to your wonderful creations!)

Toodle-oo for now! Sorry, there are no freebies in this post, but there soon will be! 😉