Too Cool!!!

Okay, I’ve just had an incredible a-ha moment, and I want to jump for joy! Course I needed to run back to you and share the joy! (Uh… if you’ve already known this, then clap your hands and pretend you’re hearing it for the first time, okay? 😆 Just kidding!!! 😆 )

So I’ve begun working on a kit that I want to give as a freebie (nudge nudge wink wink!) 😉 When I work on a freebie, I make these little squares and fill them with colors, while I try to decide on a color scheme for the kit…

Well, I got carried away with playing, and before long I had about 80 squares to fill with colors. I had copied and pasted these squares originally (think 80 layers)… and wait! Before you go zzzzz on me, let me tell you what I was wanting to do… I wanted to move up the 1st to the 8th row so I could accommodate one more row of 10 squares below them. Normally, I would select the top layer in the layers palette, hold down shift, then select the last layer on the layers palette. This, as you know, would select all the layers in between as well, so that I could move them as one entire group.

Confession time: a good deal of stuff that I’ve learned about Photoshop has come from playing and experimenting (of course the base of my Photoshop knowledge has always come from my dear friend Jessica)… Anyway, so I was in that playful mood, and I thought: well, what would happen if I just draw a selection around all these squares that I want to “catch” using my move tool?

So I tried it… and guess what? IT WORKED!!! WOOOHOOOOOO!!!!

So actually, if you want to select several items on your workspace / layout, select the Move tool and draw around it (make sure you have the Show Transform Controls checkbox checked so you know what you’re capturing with your move tool)… and when you let go of your mouse button, all that were included in your selection become highlighted on the layers palette and you can move them as a group!

Here’s a screen shot:


You’ll see that there’s a bounding box around the squares that I selected with the move tool (it appears as you draw around the squares with your mouse, so it’s a great guide that lets you know just which items you’re selecting). And over on the layers palette, you’ll see all the layers are automatically selected.

TOO COOL!!! Hee hee hee.

Well, that’s it for the intermission! Just wanted to share an a-ha moment with you! 😆


She’ll Be Comin’ Round the Mountains..

when she comes… 😆

Hello from the mountains!!! I’ve been stuck here (happily, I must admit–mostly. I’d be in heaven if I had my desktop here with my CS3 and my dsl connection) for almost a week, spending vacation time with family. I’m writing now from my dinosaur laptop, which doesn’t even have 1GB of RAM (yeah, yeah, sorry isn’t it?)… so, much as I’ve been dying to design and scrap some layouts, I just don’t have those options open to me right now. But you know what? I’ve been scribbling on my notebooks my ideas for more designed freebies, and I promise you when I get back down to civilized lowlands, I will have a lot of gifties waiting to be created and shared with you! Woohoo!!!

I am posting here though on quick notice, upon request from my friend and fellow Spraggirl, Susan. She referenced me on her blog (bless her!) regarding how I keep track of my layout credits, and she has requested me to repeat the instructions for those who have been wanting to know more.

So… here they are, my dear Susan, and many thanks once more!

The Importance of Credits

I really believe that listing credits is a hugely important habit to form, especially in the world of digital scrapbooking where we often share our layouts on galleries, on our blogs, or even in magazines if we’re lucky enough to get published. I have never yet come across a TOU (Terms of Use) from a designer who says “Please, whatever you do, don’t give me credit and don’t say that I’m the one who created this item you’re using to create your layouts!” 😆 Some do say “credit is not necessary” but they’ll also tell you that if you do decide to give credit, they will certainly be appreciative and grateful.

Considering that it only takes a minute to list these credits down, why not take that extra step to express our gratitude and appreciation for the hard work that designers put into making these designs that we happily use to display our fondest memories with, right? (Because it really is not easy to design stuff… fun, definitely–I love it!–but it is a lot of hard work that goes into the littlest thing that is created… and a lot of love! So it’s always nice to give love back when it’s given to us in the form of the digital schtuff that we’re using).

So… credits. Love ’em. Keep them. Announce them. You know the saying, “Give credit where credit is due” ? Lot of wisdom in that one. 😉

So how do I do it?

I’d like to believe that everyone in the scrapping world would love to give credit (scrappers are an amazing bunch of loving people)… the problem, I think, comes in when we have used items, changed our minds, replaced those items, and then at the end of it all, we forget from which folder we pulled out this paper and that element… 😆

So I think the easiest way is to keep track of the credits as soon as we pull in the background paper (which I assume is always the first thing we get onto a new document) and then keep adding to that… and editing the credits to reflect changed items either as we go or at the end when our layout is complete.

There are a million ways to do this–and I think this ability to do the same thing in different ways is what makes digital scrapbooking rock! It’s simply a matter of finding which way works best for you! Some people keep a notepad open where they list the items; other people make a new layer and write all the info there; etc. I’ve tried several ways as well (including making an Excel file to keep track of everything), and through trial and error, I’ve found the best way that works for me is to use the File Info option in Photoshop. (I’m sure also that I’m not the only one who has discovered this, so I can’t take credit for thinking up this process! 😀 )

Both Elements and full-version Photoshop have this File Info option.

This is how I keep track of credits:

1. Go to File (on Photoshop main menu)) > File Info. Bear in mind that we need to have a document open in order to have this option open to us. Otherwise, with nothing open on our workspace, we won’t see this option open to us).

File Info

2. In the dialog box that opens, we can put in the title of our document or layout, we can put our name as the creator, and in the Description box, we can also type in all the materials we’ve used, together with the designers who’ve made them.

File Info Dialog Box

NOTE: Screen shots are from PSE5 since that is the only program I have loaded on my dino laptop. 😉

The great thing about this is as I work, I input the information in the File Info box instead of having to open another document or file to keep track of the credits. And when I save my layout, the File Info gets saved along with the document. YAY! No more having to save and store together two different files referring to the same layout!

Then, when we need to put in the credits (say, if we upload our layout into a gallery or onto our blog), all we have to do is click on File > File Info, highlight the content in the Description box that contains our credits list… then copy/paste the information onto the Description area on our gallery upload dialog box, and voila! It’s all there!

What I love about this is that it’s kept separate from the LO itself, but in the same “drawer”– if you will– so that it never gets “lost”. Also, if midway I decide that I want to replace a particular item that I’ve used on my layout and inputted into my File Info, all I have to do is delete that item from the list in my File Info box and add in the replacement details. Then when I hit Save to save the file, everything is replaced as well with the updated credits list. Awesome, isn’t it?

Hope this is of help to anyone who can use the info! (By the way, the File Info of your photo files already contains all the EXIF details pertaining to your photo–isn’t that marvelous?)

Alrighty then, back to the mountains! Catch you again soon!

Extra(ct)! Extra(ct)!

😆

Sorry, I couldn’t resist that! 😀

I’m putting my scrapping on hold for a little while to answer a question that my friends Heather and Kari asked on our playground about extraction. I’ve tried more than a million times (okay, so maybe I  exaggerate, but it certainly felt like a million times! Maybe it was 999 times at least ) to post my answer, but the words ended up garbled and jumbled and doubled… in short, my post would have left my friends more confused than helped.

So… I decided to post it here, so that everyone can share in the answer as well (unless it doesn’t interest you, in which case you’re perfectly welcome to skip along to the next topic. 😆 ) Before we start, kick your shoes off and wiggle your toes, get real comfy and grab a cuppa joe or a tall glass of iced tea, because this is not going to be a short post. haha.

Alrighty then: Our topic for today, dear class of two (or more) 😆 , is How to Extract.

I can tell you how to do it in PSE5 and in CS3… I have no idea how to do it in PSE6 but I suspect it should be pretty similar to PSE5.

Extractions

There are many ways to extract objects using various tools (magic wand is an option, as is using the background eraser)… but I’ll share with you what I work with best (Caveat: I’m no expert, okay? I’m just a Photoshop-player 😆 )

The first step is to work with a duplicate layer. Always a good thing. 😉

FOR PSE5
1.  Go to Image > Magic Extractor

2.  In the dialog box that pops up, you’ll find instructions at the top. Just follow them. Keep in mind that the red-pen tool (1st on the left) will define the parts you want to keep and the blue will define the parts you want to remove. You can make simple dots or lines or squiggles (whichever rocks your boat) to cover these areas, though I’ve found that if you’re dealing with a photo that has very similar colors, it helps to get as much variations of those colors marked. The red and blue pen tools (not their real names; those are just nicknames I’ve given them because of how they look) are actually brushes; therefore, you can adjust these to the size you want using the [ and ] hotkeys.

3.  When you’ve done this, click on Preview on the right. If the extraction looks not great at all, don’t worry. We’ll fix that up in a minute. Take the purple eraser (3rd tool, left) and erase the blue and red marks you just made. If you need to, click on the magnifying glass towards the bottom to zoom into your image so you can catch those red/blue marks that may not be immediately visible from a more distant view. Click on the hand (last on the left) to move your image around your workspace if needed. Just make sure you get all those red and blue marks erased.

4.  To refine your extraction, use the dotted circle brush (4th) to add to the selection parts that may have been inadvertently removed earlier, or the dotted circle eraser (5th) to remove parts that were left behind.

5.  When you’re happy with what you see, click on OK and that’s it!

Pretty easy right? Beats using the magic wand tool and the background eraser tool (which can sometimes remove parts from your extracted item that you wouldn’t want removed).
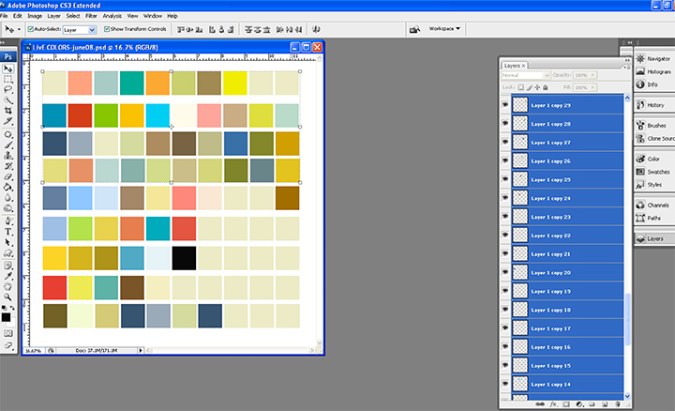
For CS3:
1.  Select the layer of the object you want to extract. Go to Filter > Extract

2.  Define your tool options (brush size, colors you want to use for highlighting and filling, etc.)

* Check Smart Highlighting if you’re extracting an object that has well-defined edges.

* Check Texture Image if you’re dealing with a lot of texture either in the object itself or in its background.

* Smooth – Choose 0 or a small value; you can always change this in the next extraction if it needs tweaking later on.

3.  Select the Edge Highlighter tool and drag it so that it slightly covers both edges of the object (a bit of the inside of the edge of your item and a bit of the outside or background that you want to remove). If you’re dealing with wispy stuff, choose a larger brush. You can use the eraser tool if you need to erase wrongly marked highlight areas.

4.  Use the Fill tool to fill the highlight-defined area.

5.  Click on Preview. Hitting the Show button will allow you to see both the original and the extracted views. I recommend using the Display view as well, so that you can see if there are any stray leftovers. You can use Display to view your extracted image against a color background for better viewing. This comes in really handy when you’re extracting something light and you need a darker background to detect stray marks.

6.  If you find stray marks in the background area, use the Clean Up tool. If you press ALT while using the cleanup tool, you can also bring back areas that were inadvertently deleted from your extracted image.

7. Click OK when you’re happy. And voila!

Pretty easy to extract, isn’t it? Gotta love Adobe. I mean, really.

GoodReads Great Read

Okay, so how pathetic is it that I haven’t been able to update my goodreads site? I have tons of books spilling over on my bookshelves and yet as of a few hours ago, my goodreads bookshelf had ONE (that’s right O. N. E.) book on the “read” list.

Well, that’s changed as of today. (There are now more than one. 😆 )

I have two piles of books to read. And to cover. They remain untouched. Except for one book that I touched today. And boy, am I thankful I touched it today!

Writing Motherhood by Lisa Garrigues

This book was given to me by my childhood favorite playmate/bookmate/cousin, who’s also happens to be a published poet in the US (so proud of her!), last Christmas. Because I’ve been totally consumed by my January playthings (LOAD, the 2peas course, the NWR course at our playground, designing freebs), I haven’t been able to do much more than glance at the nice orange cover and make a mental note to open it one day soon.

Well, I did today, and I was hooked.

I have to say (and you’ll probably think I’m quirky for saying this, and you’ll most likely be right), I always judge a book, not by its cover but by its first line. 😀 If the first line or the first paragraph grabs at me and shakes me enough to make me sit up and say “wow!” then it has me at hello. 😆

This book had me at the first line on its inner bookflap.

This book totally made me think of my playground friends! Its very title already made me think of this wonderful bunch of creative playground sisters that I have: “Writing Motherhood: Tapping into Your Creativity as a Mother and a Writer” (Okay, so maybe not 100% of us are mothers, but I’m sure 100% of us have moms 😆 )

The bookflap blurb says “Drawing on her own efforts to balance the demands of motherhood with her dream of writing, she (Lisa Garrigues, the author, who is also a longtime writing teacher) shows readers how everyday life can be a rich source of stories, and how writing can provide a means to both understand and document their experiences.”

Cool! 8)

Doesn’t it make you want to read more about it? 😀 I did a review on the book on my goodreads site; I’m not sure it’s a great review, but it should give you an idea of what it contains. You can click here or on my goodreads link over on the sidebar on the right if you’re interested to know more.

Alright then. I need to go back and do some creative work (and resist the temptation to finish this book tonight!). I’m again 3 days behind on LOAD and a lot of days behind on my next freeb for you!

As the great Tigger would say, Tata For Now! 😀