It’s no secret that I’m a hybrid wannabe. Here’s the thing, though: the biggest reason why I don’t do much hybrid stuff is because I never have enough time (or motivation) to get out a whole bunch of yummy, textural stuff then create stuff with actual scissors and glue and rulers and cutters while making sure that my younger kids don’t accidentally, say, touch the hot glue gun and then clean everything up after. Phew! See how tiring that was just to read? Can you imagine actually doing it? (Hybrid experts, I salute you!) 😀
So when one of my sons takes home a school project that requires parental participation, I sigh and scratch my head, but really, I’m secretly delighted because I have no choice! I have got to get down on my knees and put my hybrid skillz (whatever little I have 😉 ) to work!
This weekend, it was my six-year-old boy’s turn to be my school-project-partner. The task: Create a toy laptop using at least 5 different recycled or old materials.
Nice.
Well then… there was nothing to do but get to work! (And maybe get the camera out, too, so that in case you ever find yourself having to create a toy laptop from recycled materials, you just might find some cool ideas here! 😉 )
STEP 1: Do the caveman thing: hunt and gather!

First order of the day: Collect all the junk you can get your hands on. Never mind if you won’t end up using half of them. It’s just nice to know that you’ve got enough junk to create with (and by using them, you make space for even more junk to collect! Win!)
STEP 2: Have the essentials ready.

Essentials in this particular case would be the project instructions, your hand-drawn diagram of what the finished project might look like, a list of possible materials to use for each part, and yes, that ever-essential super-mug of coffee (or Diet Mt. Dew or hot cocoa, or whatever makes your little hybrid heart happy).
Step 3: Rule it!
Grab the biggest carton that you can find. (I knew there was a good reason to hold on to that box of my laptop stand! 😆 ). Get the metal rulers out (a metal ruler doesn’t get nicks like plastic rulers do, in case your cutter decides to get naughty and cross paths with it). Start trimming off the edges you won’t need.
Step 4: Get a super-cute hybrid helper.
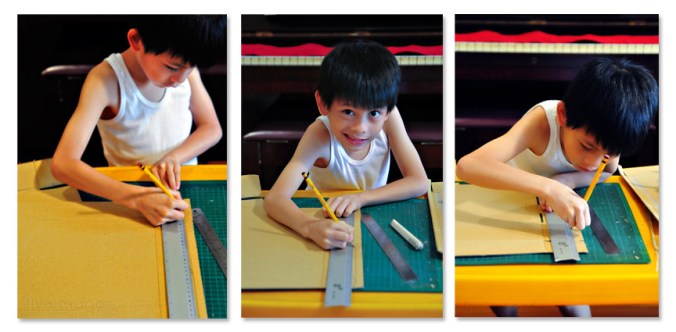
Just because it’s always fun to work with a cutie. 🙂
Step 5: Slot it.
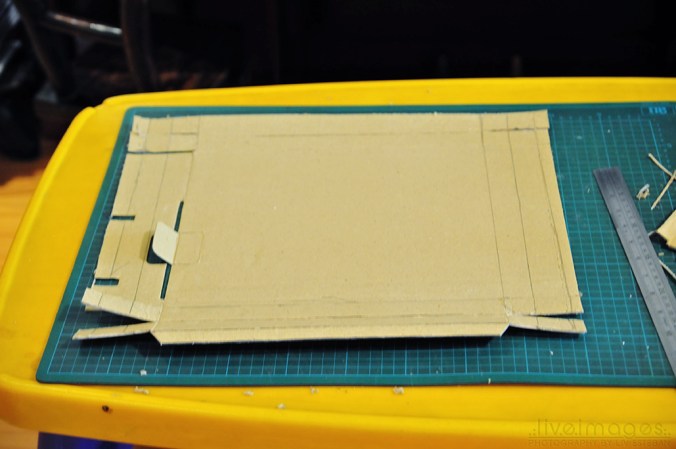
Cut little slots into the sides to create flaps, which will then become the fortified sides of your box.
Step 6: Nip and tuck.
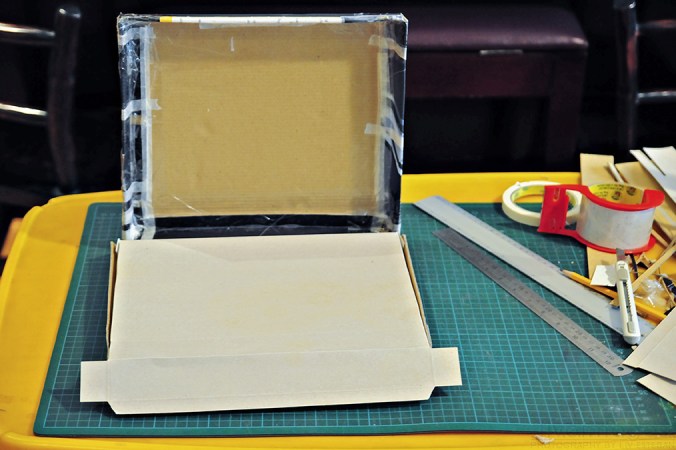
Or, actually, fold and tuck… the sides of the box. Use masking tape to keep the flaps down, in case your carton is thick and refuses to stay down.
This is going to form the body of the laptop. (I’m just sayin’… you know… just in case the box starts to resemble something a pizza would be delivered in… which I think it kinda did for a while. And that’s how I knew we needed to break for a snack 😆 ).
Step 7: Tape and cut.

Oookay. When your tummy is settled and happy, get one side of an old gift box and measure it so that it fits inside your main carton. This will form the base upon which your keyboard will rise. 😉
Tape the sides of the keyboard base. Then cut out 4 strips (measured to fit in the inner part of the other side of your main box). The leftover carton trimmed from the box comes in handy for these little pieces.
Step 8: Got foam?
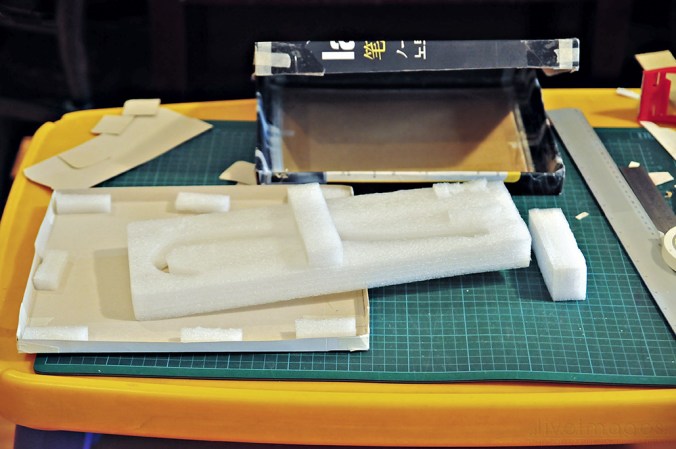
If your old box came with packing foam inside it, like mine did, do the happy dance! If it didn’t, any semi-stiff material that you can find lying around will do the lift-up job.
Let me explain the how’s and why’s:

Cut up strips of foam and stick them around the sides of the keyboard base. Oh, and the middle part too! This will take care of the extra cushioning you’ll need so that the keyboard base doesn’t lurch inward once eager kid-fingers start “typing” on the keyboard.
Step 9: Bring out the gun.

Turn the keyboard base over, take your glue gun and shoot glue over the sides where the keyboard edges meet with the lower part of the carton.
Step 10: Slice and dice.

Take the leftover carton and cut little strips for the trackpad (scissors come in handy for curving the corners of the trackpad) and then cut the strips into little squares to form the keys.
Stick all of these temporarily with masking tape on any expendable piece of carton, just so you can see how the keys will all line up (plus it makes it much easier to paint them, which is the next step coming up).
Step 11: Go forth and spray.

Step outside into the great green garden, carrying old newspapers to protect the grass… and spray away with old paint left over from various projects.
Step 12: Be Sharp(ie)!

When the paint has dried, take your Sharpie pen and write the letters and symbols of the keys on the little painted cardboard squares.

TIP: It helps to copy from a real laptop! 😀
Step 13: Monitor, monitor.

Print out whatever image you want to use as your monitor image. For our project, I transformed my Facebook page into my son’s using Photoshop. I replaced the profile photo strip with photos of him working on the project. I included an imaginary conversation between his teacher and him, which was a great place to list all the materials he used on the project. 😀
Step 14: Have an apple.

Print out your logo, cut, and paste on the cover of your “laptop.” (I briefly considered using a mango or some other tropical fruit, but Apple won in the end. Hahaha).
Step 15: Watch the wires!

Take a pipe cleaner and bend it a bit. Stick this onto a strip of black leftover carton (folded in half to create both sides). Tape a tiny piece of cut-off pipe cleaner to form the other metal side of the plug. Stick back and front sides of folded carton with glue gun.
Step 16: Check it out!

Check if your laptop looks fine. Do a whoop and a victory battle cry together with your cutie hybrid helper!
Step 17: Fall in love…

… when you see the look of sheer delight and excitement on your little project-partner’s face!
And voila! You’re done! Wooooooot!!!
PS. And if it looks like your little ones aren’t going to sleep early that evening because they’ve “got work to do” on their laptop, don’t say I didn’t warn you! 😉


Very cool Idea – Can see that they really got into it!
LikeLike
thank you! 🙂
LikeLike
The laptop looks great!! Love how much effort you put into it…
LikeLike
thank you so much! it was a load of fun to do, especially with such a great little craft-partner beside me 🙂
LikeLike
COOL!
BE ENCOURAGED! BE BLESSED!
LikeLike
I have no idea what ‘hybrid’ is used in this context, (can relate it to enviro-friendly cars LOL) but nonetheless, this is a fabulous blog post and photos series. Love the happiness on the kids faces and the finished product!
LikeLike
haha! thank you for your kind comment, suzan! i can see the hybrid-car thought bubble in your head, lol. “hybrid” is also a term that scrapbookers use to refer to a combination of paper-scrapbooking (or hand-crafted art) and digital scrapbooking (or digitally-created art). i’m a hybrid-wannabe who spends way too much time on the digital side of things and who uses my kids’ projects as the perfect excuse to try my hand (literally) at crafting. 😀 thanks so much again for taking the time to leave such heartwarming words. (((hugs)))
LikeLike
This is hybrid at its best!
My four-year-old always gets on my computer and says, “Gotta wook somefin’ up…. (gotta look something up)” Wonder where she’s heard that one!
I adore that joyous grin on your son’s face –
LikeLike
Soooo cute! What a lot of work but it turned out wonderful, bet your son just loved it! Thanks for sharing this, I just hope I am never called on to do this, lol…if so I will know where to look!
LikeLike
thank you so much, kasandra! it took us the entire afternoon (phew!). if you ever find yourself with this kind of homework, i promise to be on call as your personal cheering squad! LOL. (((hugs)))
LikeLike
man…that is quite a project for a six year old….good thing he has a creative mom 🙂
LikeLike
actually the really good thing is that his mom has even more creative friends whom she can bug for help 😉 (i only wish we lived closer to each other :D). big big (((hugs)))!!!
LikeLike
That’s the best homemade project ever! Love it! You & your cute son are awesome and congratulations on a job well done! Looks like an A+ to me! Great photos of the process too!
LikeLike
hahaha! my friend, you are AWESOME! wish you were my son’s teacher, i really do! then i’d be volunteering to be classroom mommy every month! hahaha! ❤ ya!
LikeLike
This is just wonderful! ~Ann
LikeLike
awww! thank you ann! YOU are wonderful!
LikeLike
What a project! I’m with you about the hybrid stuff–glue and I just don’t get along! Your son is just too darling and I’m glad you had fun together. I’m sure this is something that he’ll remember!
LikeLike
thank you so much, my friend! if he doesn’t remember, i’ve got the photographic evidence! LOL! ❤
LikeLike
This made my heart sing. I remember making things in this way when I was a child and you don’t see that much anymore. That is one beautiful laptop. It appears that Facebook is on the screen? Very Impressive!
LikeLike
thank you so much for your very heartwarming comment! yes, i replicated my facebook page using a screenshot and changed several of the entries to make it seem like my child’s facebook page (the joy of photoshop! :D). it’s always lovely to work with our hands, no? again, many thanks for dropping by and for such kind, encouraging, and inspiring words. blessings to you! xox
LikeLike